I am a little concerned right now.
Tumblr has been in the news again. Not for any particular controversy, rather it is coming to light that revenue is starting to be a problem for the service. For me this is unfortunate, as my Tumblr is easily the best performing out of all of my social media platforms, it is also my best fed as the simple format allows for me to casually update it with photo updates of my current WiPs with minimal effort. The only platform that offers anything similar is Instagram, and if I migrate, I will be starting again from scratch.
I have considered doing more Youtube stuff, unfortunately video production requires an order of magnitude more work, and quite frankly I don't have the voice or the face for it. A Facebook page is just meh, and it doesn't quite have the discover ability of the other platforms. Finally, for me, Twitter these days is nothing but retweeting dumb stuff, socialism and other people's minis. What's more, I'm genuinely scared of having an open account due to the quite frankly scary amount of fash types online and out for blood these days.
So, as I go forward, I'm going to take the attitude of hope for the best prepare for the worst. Investigations into Instagram shall commence immediately, including opening an account and starting to mirror my posting with my regular Tumblr traffic. I'm also approaching the end of the line with Bolt Action British infantry, so very soon I hope to start on a swath of more interesting and diverse Warhammer 40k projects, which are far better fodder for the internets that the World War 2 related nonsense.
Anyway, just so everyone is aware. I hope to get posting again once my slow burn projects are done.
Instagram: https://www.instagram.com/little_mangs_of_war/
Tumblr: http://littlemangsofwar.tumblr.com/

Thursday, June 29, 2017
Wednesday, June 28, 2017
Gamers Behaving Badly
"Sup F*****ts", the cry that ricocheted around the room.
I looked up from the unfolding engagement between my stalwart Astra Militarum Infantry company and my opponent's Mechanicum war-host.
The man, barely old enough to claim the title, stood at his table with a half-unpacked army mostly in front of him. He looked like any other gamer in the room, bearded and dressed like any other game bro that I'm sure that you, dear reader, have seen a dozens of times before. In short, not so different from any one 40k player that you care to find at any Games Workshop of FLGS. One of the members of my own gaming circle had the misfortune of being paired against him in the next round, and by all accounts he didn't have a great time of it.
It was an easy thing to ignore at the time, certain thresholds of behavior in these circles are par for the course in Wargaming circles and for the sake of getting by without making waves, you generally ignore it unless it becomes a problem. Looking back now, such behavior neatly correlates to just about every article on the subject of why these circles are generally unpleasant to be in for anyone that doesn't fit the gamer bro archetype.
This is why I generally avoid started to avoid the tourney circuit after spending a couple of years playing Flames of War at CANCON and a couple of small 40k ones. One of the cited advantages of tournament games is that it forces you out of your comfort zone and clique to play against people that you don't normally play against. The very same thing, by my experience can sometimes be the worst thing about tournament play. Every game that is not against someone you know and trust is like playing Russian Roulette, except instead of getting a bullet, you get a toxic arsehole as an opponent, often paired with an aggressively friendship ending list. The ensuing game is neither fun, nor helps you grow as a player. When standing at the other side of the table, getting shellacked by such a hideous combination, it makes one starts to wonder why you would pay money to give up your weekend to endure this kind of abject humiliation.
This is how communities die. The worst ten to twenty percent of the group gradually sap the morale of the rest to the point where the value proposition of choosing to spend time to play these games with them becomes clearly not worth it. Attendance trickles down to nothing, and the scene evaporates. Often the game itself is part of the problem, take a listen to any competitive 40k podcast over the last two years and you get a window into exactly how degenerate strategies in a rules set can fuel to toxicity of a community.
At this point in my hobby I generally shy away from large communities, and stick with my smaller clique of people that I trust. Generally I get better games in and the game winning net lists are generally not used due to the unwritten rule that going down that path makes things not fun for everyone involved.
Nobody should be forced into an environment and play space where they feel like they are going through the motions of playing a game, have the odds stacked against them. Then to add insult to injury, endure crappy treatment from their opponent. Ultimately it drives them out of the hobby making it bad for those that remain, as the pool of decent opponents shrinks and the shit-lords reign supreme.
Ultimately this creates a hostile and over-competitive wasteland of a scene, where only the worst of the worst roam. They to eventually leave as they slowly come to realization that the only people left are those just like them, and ultimately, they don't want that world any more than the rest of us.
Tuesday, June 27, 2017
The Emperor's New Groove
The new edition has come, been purchased and opinions on the internet grapevine are starting to appear. So far the news comes out, not as a howling maelstrom of despair comparable to the release of Age of Sigmar, but with a nice, restrained joy that makes for a nice change from the regular bitterness and anger that I've come to take as par for the course in the online war gaming zeitgeist.
For a long time there seems to have been a tacit acceptance that the 40k, as it stood would always be what it is; a bloated and aging rules set that is carried on by sheer inertia of both the company and community. That was until Age of Sigmar at any rate.
I admit, I was among the many scoffers for such a violent destruction and rebooting of the Warhammer Fantasy franchise. Then again I wasn't particularly invested in it so I watched it more as an bemused spectator rather an army burning frother. However, in the fullness of time I can see why they took as big a gamble as they did. A few dumb but thematic rules aside, the new rule set quite clearly laid the ground work for a new fast play model, designed to make games fun and engaging again. Then with the release of the Generals Handbook the game became viable again not only as something fun to play, from my observations of it, but more structured with the reintroduction of a points system making it valid for competitive play again.
The 8th edition of the Warhammer 40k rule set, from my first impressions, borrows from the best of Games Workshop's Age of Sigmar experience and from my one game so far, it seems better for it. The rot and the codex creep that have long been a fact of life in the game seem to have been soundly demolished. Mechanics wise things seem to have swung in the direction of allowing more units to survive the opening rounds of shooting, which is definitely a plus. The reintroduction of a subtractive AP system compared to the target number of the prior editions helps make this possible, and has made a whole swath of units far more survivable on the field; which means traditionally low save armies like Orks and Guard are now fun to play again.
The removal of the traditional vehicle rules was something I was not entirely sold on, but given the how large monstrous creatures such as the Riptide, dominated the table I can appreciate the mechanical reasons for doing this. Tanks and vehicles in general are now more survivable, and have to be whittled down just like monstrous creatures, putting them on parity in terms of durability, thus making them as much of a viable choice as, for example, the hated Riptide.
In terms of close combat, I've yet to run enough scenarios to fully get a feel for how it works now, but thus far it seems promising. With characters being significantly nerfed in their ability to completely wipe a squad with challenges and the ability for everyone to fall back makes close combat less of an ability to lock units up for the entire game. This provides more options for units to extract themselves from melee, so no more locking heavy units in close combat with an unbreakable mob. Even the introduction of the battleshock system from Age of Sigmar cleans up the morale phase, making it less time consuming to action on the table top.
Overall, for the first time in a while, I'm hopeful that this game will be playable for more armies apart from the ones on top of the current meta. Of course, this could all turn to rubbish the moment a particularly egregious release hits the table top, as I've heard a few of these have happened in Age of Sigmar. Fortunately I've also been hearing that Games Workshop has been willing to patch their game more quickly. It is early days yet, but this is a promising start to what is hopefully a better period of fairer, more versatile play. Only time will tell if this is a lasting change for the better, but for the first time in a while, I have hope for the state of the game.
Friday, June 9, 2017
Where I'm at, and where I'm going with the hobby. 2017 and beyond.
If I am honest with myself, I'm a bit of a war gaming magpie. I tend to buy a lot and play comparatively little. My pile of metal and plastic, while impressive has been a constant source of irritation for me. With 8th edition 40k looming on the horizon, combine with the fact that 40k is the only game I play on a regular basis has given me reason to re-evaluate my hobby priorities.
Furthermore I've had to recently check my aspirations regarding painting at a competition level after my last attempt to enter the Crystal Dragon. I've learned that I don't really have the artistic talent, or patience for it. So I've decided to focus on a solid table-top quality for most of my projects. That is not to say I'm going to stop trying completely, but I won't go out of my way to spend months at a time on a project for a comp. If I have something ready in time, great. If not, no big deal, I've got bigger projects to tackle in both hobby and life.
This reflection has led me to think about what I want to get out of my future hobby work. For example, I've put in a great deal of effort in bringing my Spartan Games stuff to painted, yet nobody in Canberra plays it, including the Halo Wars stuff. While no doubt much of it has made me a better painter for that scale, having it languish in storage unplayed seems like wasted effort. To this effect I've decided to plan out my hobby time and break it into actionable chunks, good life advice in general for tackling any problem so large that you can't store it in your brain as one coherent thought.
So with that in mind, my hobby goals are as follows:
- Have an army for all of the major system.
I already have three 40k armies which I will be adding to, as well as starting a new all Primaris force and some Dark Eldar waiting for assembly in paint. Since 40k is my most played game this is fine, despite being saturated. I have a full crew for Malifaux, all I need to do is get some games in. A full force of PanO for Infinity which I will be rounding out with a TAG next cycle. I have a Cygnar and Team Yankee force, both of which I'll slowly be growing. Finally, my Bolt Action / Konflict 47 should be ready soon and that will be all for 28mm WWII. In terms of skirmish games I have a Frostgrave warband fully painted and ready, shame the scene has died locally. I'm also looking into starting an Age of Sigmar skirmish warband, we'll see about the specifics once I grab a copy of the book. - Play more games.
My regular gaming group does a fortnightly games Sunday, which is about the right sweet spot for me. However, I'd like to play some of my other minis. To do this I'm going to investigate what is happening locally with Infinity and get in on the Malifaux scene, which has a regular, but inconveniently timed regular night. - Paint at least one display quality piece a year.
While I have been demoralised about painting to a high standard recently I have got a fresh bunch of 40k minis that I'm aiming to do to a high standard. Notably the third Triumvirate set, Rowboat Gullyman and pals. I've also got one of the high quality sculpts from Twisted and the Excelsior Warpriest from AoS. I'm going to aim fairly high for these chaps and try to put them on a decent display base, but I doubt I'll make the cut in the next Crystal Dragon, as such I'm not going to devote too much time for them. I've got too much to do.
In a semi-related note, I have taken up Unity Game development because I'm a sucker for punishment apparently. While it is cutting into my hobby time quite substantially, I'm well on my way to having a viable game to release, probably for free on Itch.Io as some kind of Unity WebPlayer thing. Anyway, I hope to do this blog more in future as Tumblr is not really the environment for long winded pieces like these. I'll also be reposting my articles that I have written for Tumblr to here as time goes on, I've already posted my piece on how to paint Bolt Action British Riflemen. Anyway, have a good one.
Thursday, June 8, 2017
Camouflage Fatigues by way of Shaded Basecoat
Camouflage Fatigues by way of Shaded Basecoat
The shaded basecoat technique is something that always seems like black magic to me. The fundamental idea of the technique is to start with a very light base coat and use layered, controlled washes to gradually bring the light basecoat down in tone to your base colour, while leaving the sharp edges and raised areas on the base colour to achieve your highlighting that way. I’ve attempted to apply this technique many times to a variety of different miniatures with a reasonable spread of success or failure. I’m particularly interested in this technique for painting camouflaged material, as it is hard to layer an intricate camouflage pattern using regular miniature painting techniques. I’ve had some a reasonable spread of success and overall have achieved a middling table-top level of quality. I think this technique could work well for batch painting larger armies for larger projects that require camouflaged uniforms, armies like world war two germans and cold war western armies are my go to examples.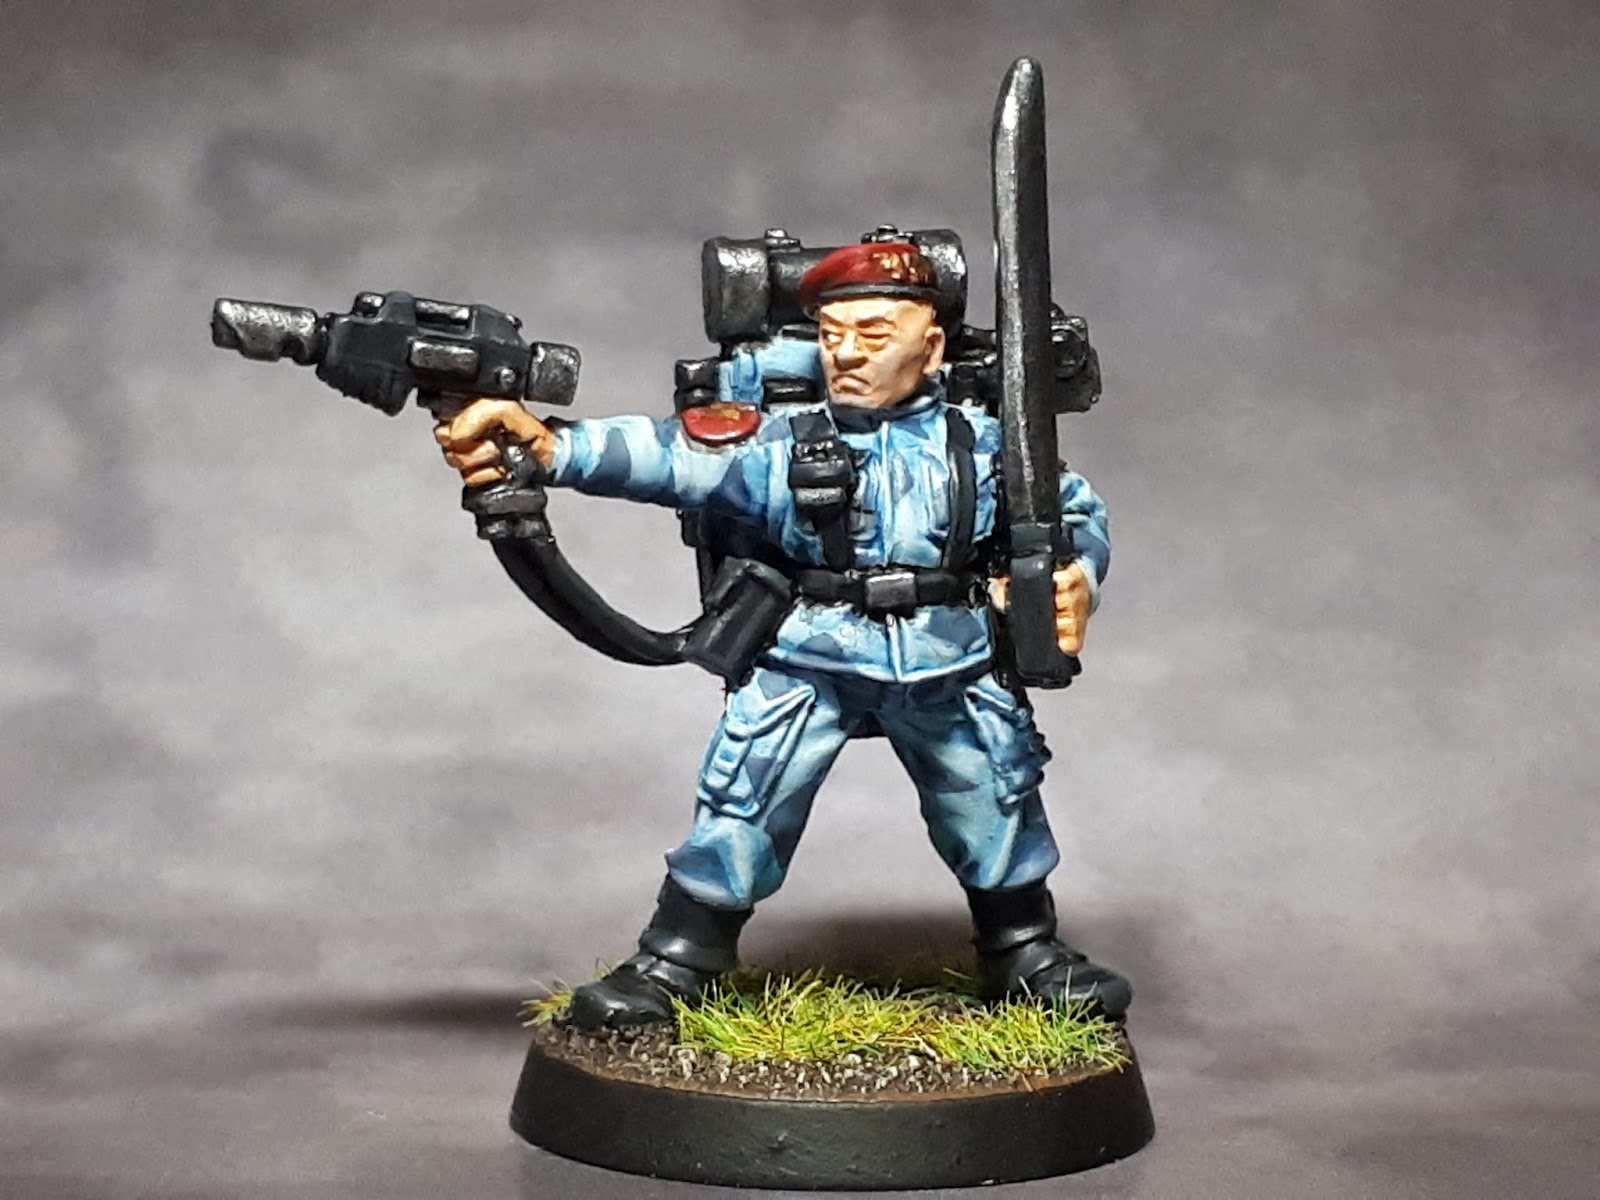
By the way, if you’d like to see this technique broken down by a far more competent painter, I’d recommend checking out James Wappel’s blog, the painter that invested the technique as far as I know.
http://wappellious.blogspot.com.au/p/using-shaded-basecoat-technique-to.html
Basecoating
I’m aiming to paint tiger stripe jungle and a generic tan and brown pattern on the other. To get the base colours down I started with my highest highlight colour for the majority of the uniform. For the tiger stripe uniform I went with Dead Flesh, a pale green and Bonewhite for the tan uniform, which is a brown tinted white. After a three layer pass of the base colours I then pick a much darker pattern colour and established a solid pattern on the uniforms. A sharply contrasting colour is ideal here, go for blacks or dark browns in most cases, though dark grays and blues for urban camouflage.
Shading

Next up select your mid-tone colour and make a thin glaze out of it, I used a mixture of vallejo glaze medium, water, and my colour to do this. This stage can take the most time, as you have to wait for each application to dry between coats. The goal is to tint the entirety of the model with your mid-tone, and add further colour to the shadows and recesses to emphasise the folds on the uniform. Don’t worry about going over the pattern colours, as the dark colour will be far less affected by the glazes than the main colour will be. I did this about six times, though you should repeat this process until you are happy with the result.
Deepest Shades
To further emphasise the deepest shadows I’ve taken a darker brown ink and applied it to the deepest recesses and in between the legs. The colour I used in this instance is Game Colour Smokey Ink, though any sufficiently dark brown ink or wash will work just as well.
Highlights
I’ve re-applied my highlights where I felt it was necessary, using a mix of the mid-tone and the highlight colour for the broad flat highlights and the pure highlight colour for the sharpest edges. This should finish up the basic shape of your uniform. At this stage I also reapplied the pattern colours where I thought it was necessary. Now go ahead and finish the remaining details on the miniature.
Final Results
Team Yankee - Painting the T72
Introduction
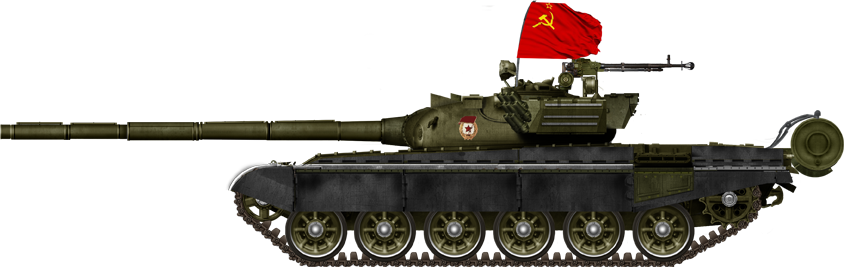
The T-72, first put into serial production in 1973 in order to update the Soviet Tank Arsenal which consisted of the T-54/55, which was a tank of immediately post World War 2 Vintage, and the T-64, which was plagued with a variety of technical and production problems which limited its production. This tank was optimised for mass production, combining a low silhouette with modern armament and armour. Around the 1985, the year the events of Team Yankee take place, the T-72 was the mainstay armoured vehicle of the Soviet Union and all her satellite republics, produced under licence in Poland, Yugoslavia, Czechoslovakia, and others. Moving on to the present day, the T-72 remains in service with many countries and is still being produced. In terms of combat performance it does suffer from lack of armour compared to its contemporary armoured vehicles, but none the less it remains a ubiquitous armoured vehicle.
In terms of painting, while the rule books gives an official colour guide, they are listed in the Colours of War range by Battlefront. Since I’ve had a hard time getting my hands on the necessary colours I’ve opted to start with experimenting with Vallejo and working from there.
Hull
I based the hull colour on a variety of photo reference of T-72s from the 1985 period and more generally. With these references I experimented with a variety of colours, and in the end settled on US Dark Green (VMC 70.893). This colour is probably a little darker than a couple of the examples listed, but ultimately it doesn’t matter that much as I lightened it up with some Buff (VMC 70.976) mixed into the base colour to get the highlights.
The base coat is going to go on as four to five thin layers over all hull areas of the entire model. Once that is done I applied a slightly thinned down wash of Army Painter Dark Tone Ink. Once the wash is down I used a damp brush to clean up the excess in order to prevent tide marks and large, ugly patches of wash from pooling.
 And now I’ve done a heavy drybrush of US Dark Green, followed by a lighter drybrush of a roughly ¼ ratio mix of Buff and US Dark Green.

Tracks
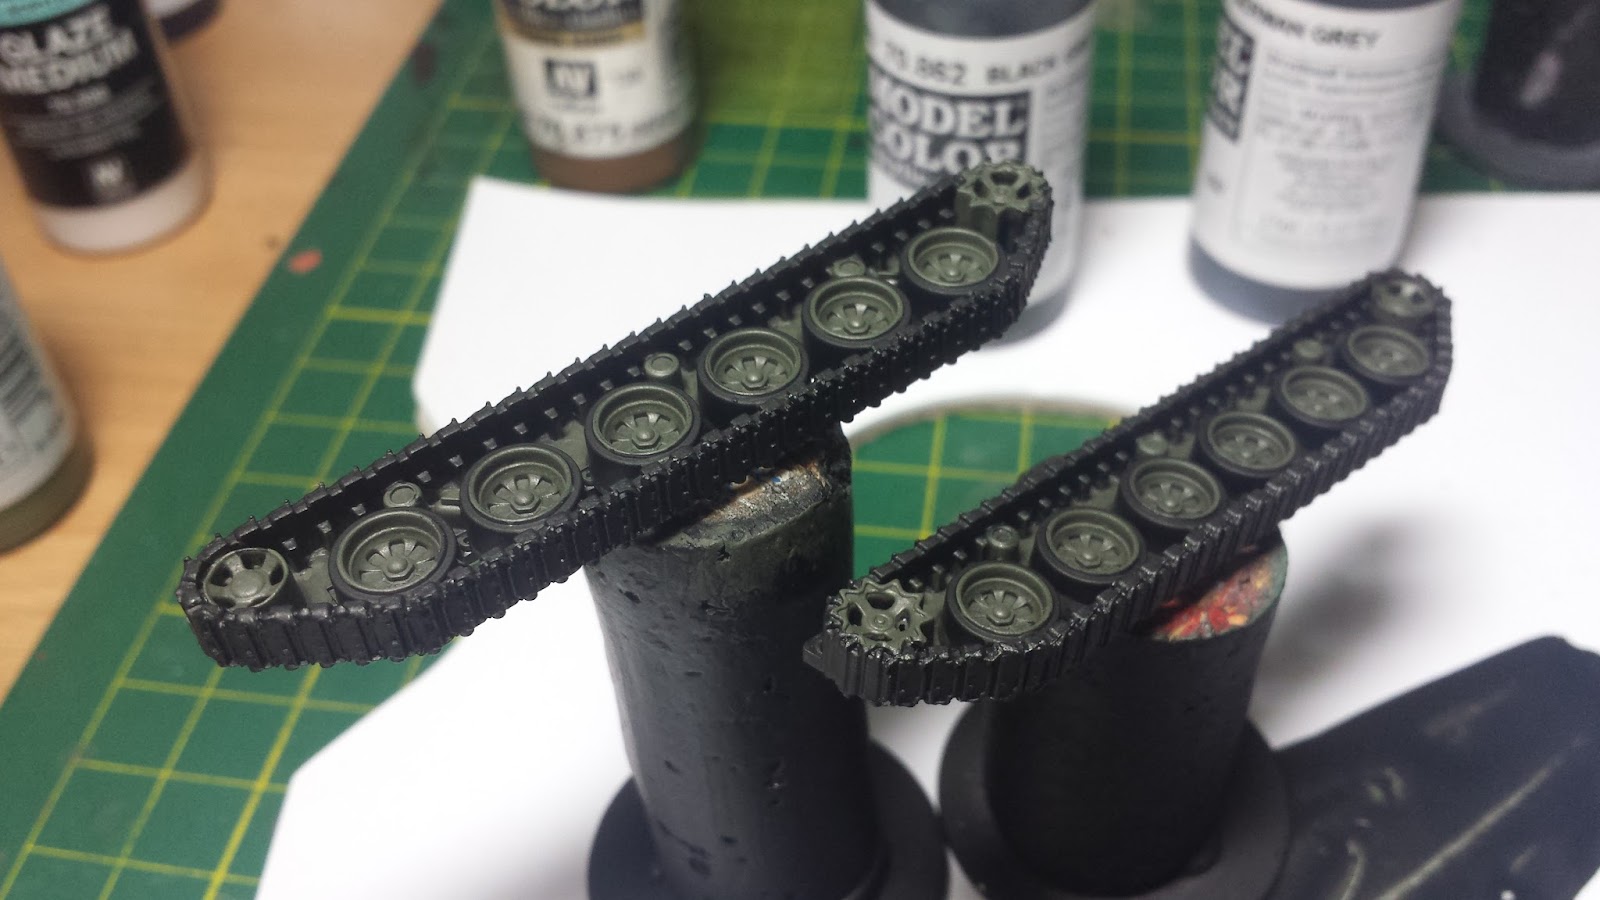
After I finished the first pass on the hull colour I started on the details. The first being the rubber skirts and rubber road wheels. To start with I did a 2-3 layer basecoat of Black (VMC 70.950). Next up I layered Black Grey (VMC 70.862) over the black.
The tracks modelled on the model appear to be the metallic only version, lacking the rubber pads that make it easier to drive on roads. Therefore I’m opting to paint the tracks pure metallic. Since I want to keep the metals realistic, hence muted metallics. To do this I will use Black mixed in with Gunmetal Grey (VMC 70.863) at a 4/1 Black/Gunmetal ratio. Once our basecoat is down and dry I’ll give the tracks a very light drybrush of a Black/Gunmetal mix at a 2/1 ratio.
I also did a first pass at weathering the tank at this stage. To do this I washed in some Chocolate Brown (VMC 70.872). To get this wash I mixed the colour in question with a heavy amount of glaze medium. Once the weathering is dry I did another light drybrush with with the 2/1 mix of Black/Gunmetal.
At this point I left the tracks to dry overnight as the glaze medium drastically slows down trying time. Once that was completed I assembled the lower hull and let it dry. While that was going I painted the Canvas Mantlet cover on the main gun. For this colour I used Beige Brown (VMC 70.875), once it was dry I followed up with a wash of Army Painter Strong Tone Ink, let it dry, then re-layered all but the deepest recesses with Beige Brown.
Fitting It Together
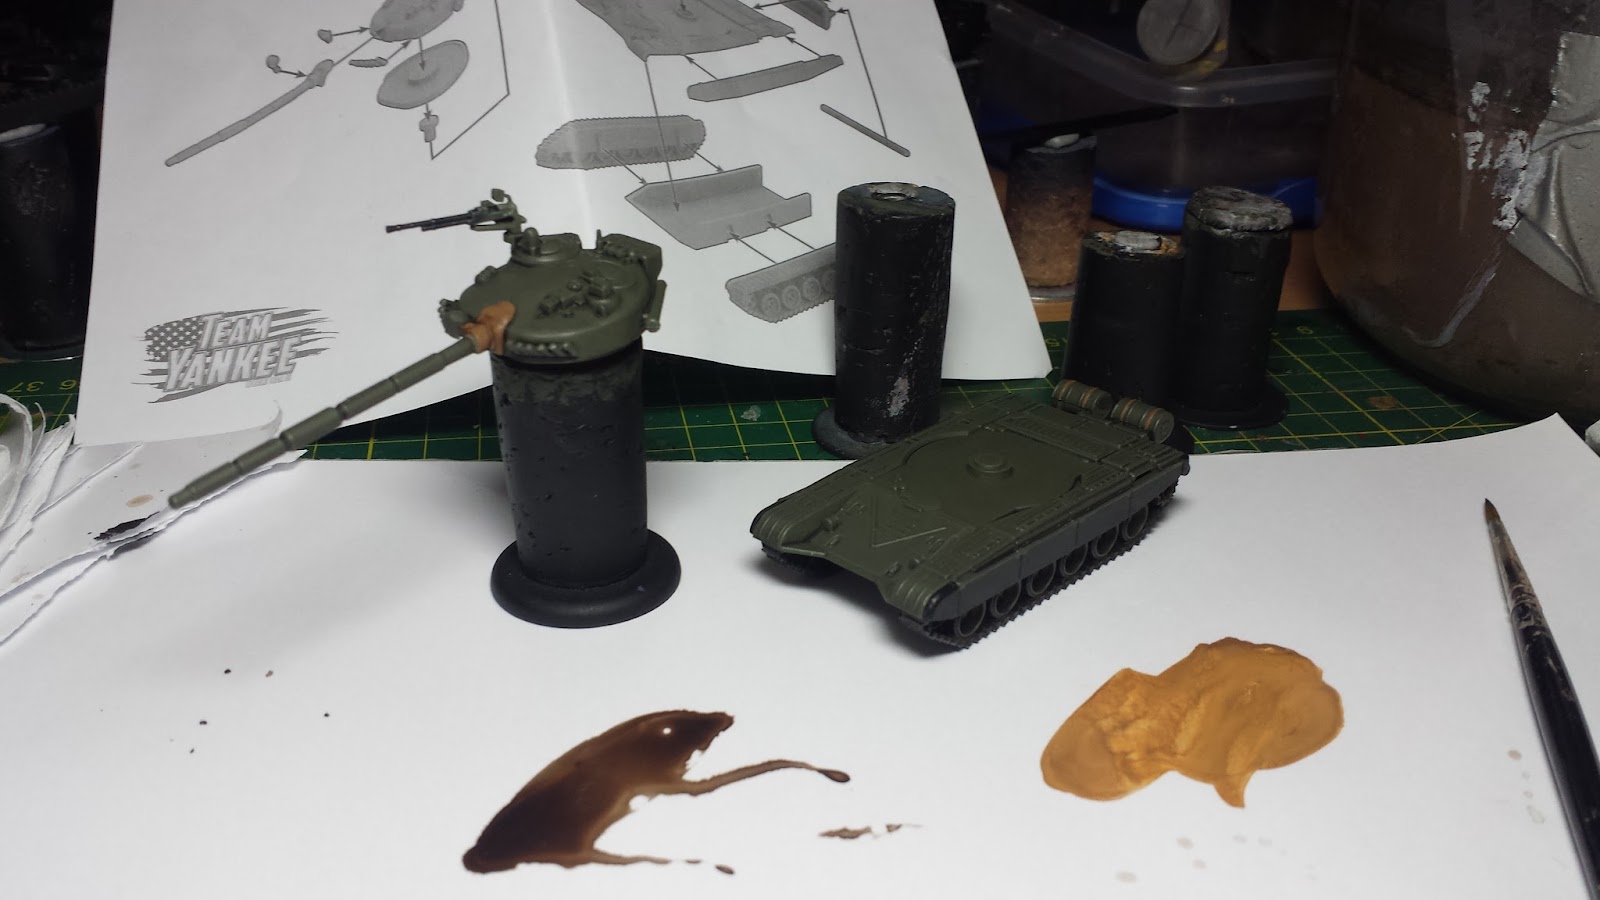
Next up I applied the transfers using my usual combination of Glaze Medium and Gloss Varnish (VMC 70.596 and VMC 70.510) to prepare the surface. Then I used Microscale Industries Micro Set and Micro Sol to prepare and apply the stenciled number transfers that came with the models. I left them for an hour to fully set, then I applied a mixture of Matt Varnish (VMC 70.520) and Glaze Medium in order to kill the gloss from the preparation step.
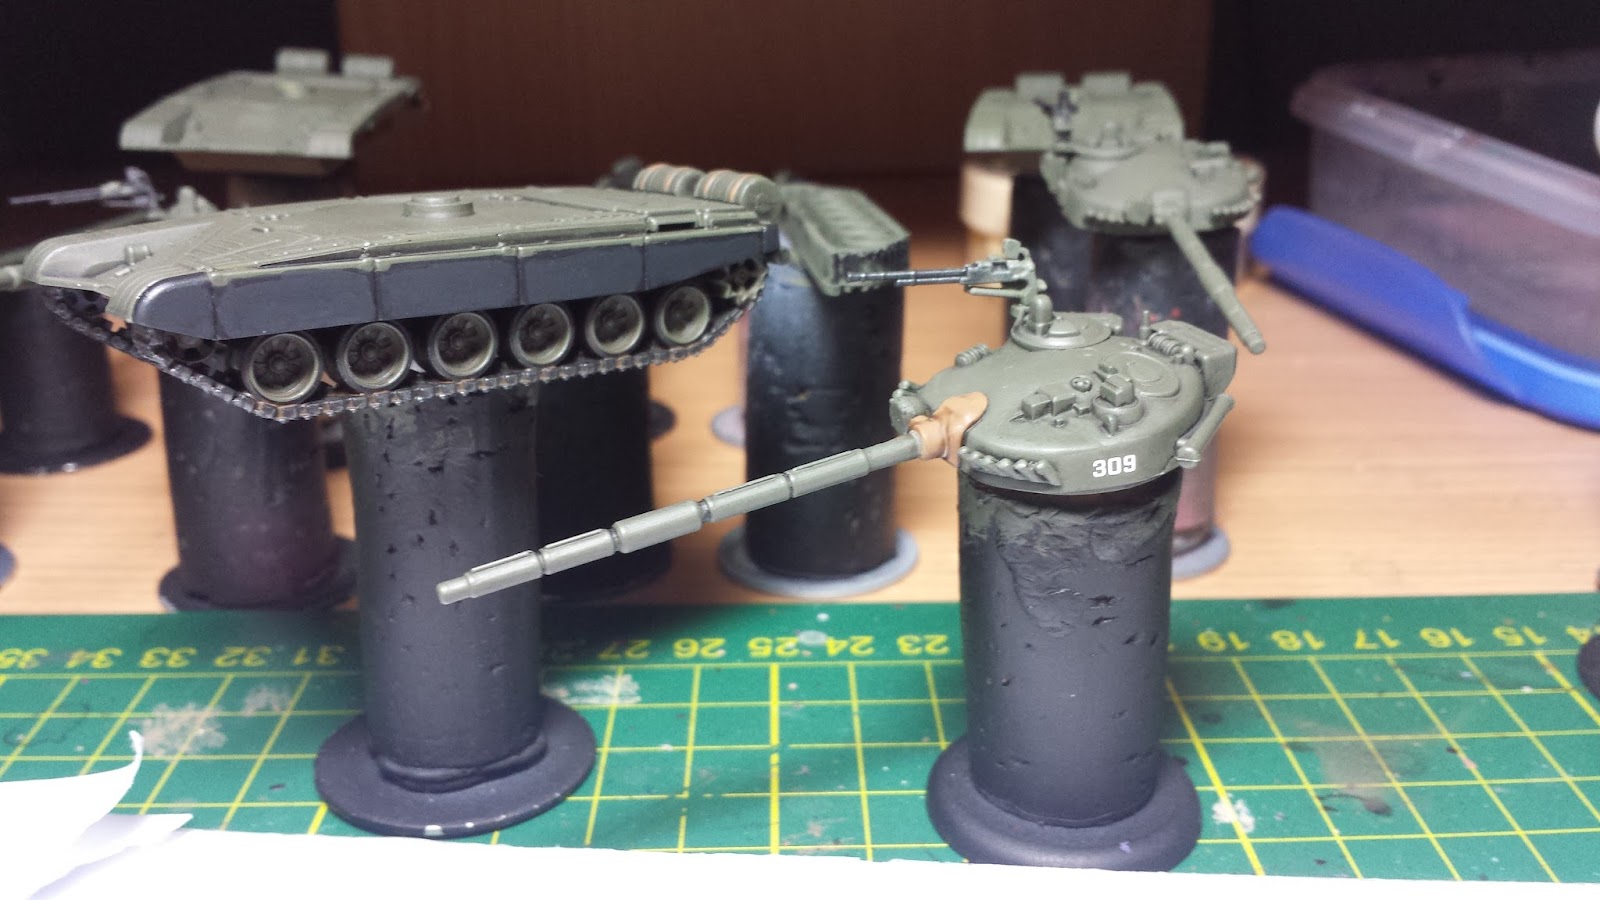
To Finish the T-72 I did two drybrush layers. The first layer was an soft, overall layer of Dark Sand (VMC 70.847), for this model I went a bit too heavy, as I often do with dry brushing. For future models I will remember to take it easy. Next up I did a fairly heavy drybrush of Flat Earth (VMC 70.983) on the lower hull, side skirts, tracks and running gear. At this point I’ll finish up the DSHK with the same colours that I used for the tracks, except I didn’t bother to highlight the metal.
Final Highlights
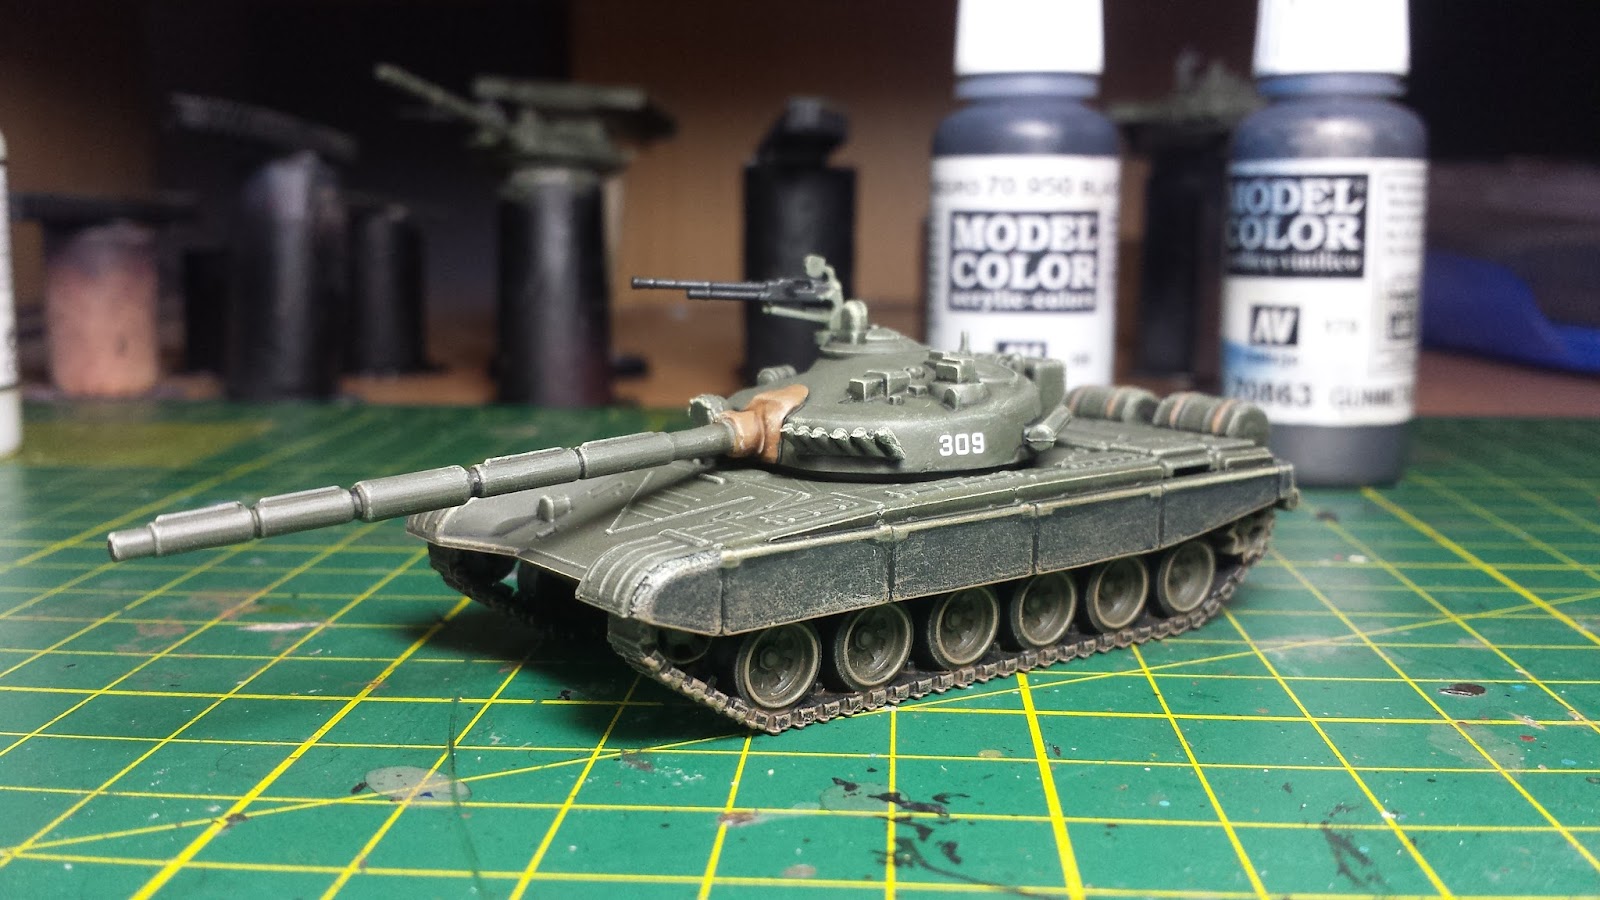
With that done our model is complete. Overall I’m happy with this result, especially since I have nine more of these vehicles to complete and the time taken to achieve this result was very quick in terms of working time. I could probably batch the entire line out in a weekend if I had the inclination to do so. One thing I didn’t get quite right compared to real life were the ammunition boxes on the cupola machine gun. They were normally a canvas of some kind or a differently coloured metal, but I opted to leave them the same colour as the hull out because I am a lazy painter with too many models to paint.
I’m planning to use this paint scheme for the rest of my Team Yankee Soviets, and will work perfectly for any other vehicle in the Soviet army list, save for the aircraft. Once I finish off the tanks are done I’ll have a crack at the Hinds and write up the results. I hope this guide was useful to you and thanks for reading.
Colours List
Vallejo
US Dark Green (VMC 70.893)
Buff (VMC 70.976)
Black (VMC 70.950)
Black Grey (VMC 70.862)
Gunmetal Grey (VMC 70.863)
Chocolate Brown (VMC 70.872)
Beige Brown (VMC 70.875)
Dark Sand (VMC 70.847)
Flat Earth (VMC 70.983)
Glaze Medium (VMC 70.596)
Gloss Varnish (VMC 70.510)
Matt Varnish (VMC 70.520)
Army Painter
Army Painter Dark Tone Ink
Army Painter Soft Tone Ink
Introduction
The T-72, first put into serial production in 1973 in order to update the Soviet Tank Arsenal which consisted of the T-54/55, which was a tank of immediately post World War 2 Vintage, and the T-64, which was plagued with a variety of technical and production problems which limited its production. This tank was optimised for mass production, combining a low silhouette with modern armament and armour. Around the 1985, the year the events of Team Yankee take place, the T-72 was the mainstay armoured vehicle of the Soviet Union and all her satellite republics, produced under licence in Poland, Yugoslavia, Czechoslovakia, and others. Moving on to the present day, the T-72 remains in service with many countries and is still being produced. In terms of combat performance it does suffer from lack of armour compared to its contemporary armoured vehicles, but none the less it remains a ubiquitous armoured vehicle.
In terms of painting, while the rule books gives an official colour guide, they are listed in the Colours of War range by Battlefront. Since I’ve had a hard time getting my hands on the necessary colours I’ve opted to start with experimenting with Vallejo and working from there.
Hull
I based the hull colour on a variety of photo reference of T-72s from the 1985 period and more generally. With these references I experimented with a variety of colours, and in the end settled on US Dark Green (VMC 70.893). This colour is probably a little darker than a couple of the examples listed, but ultimately it doesn’t matter that much as I lightened it up with some Buff (VMC 70.976) mixed into the base colour to get the highlights.
The base coat is going to go on as four to five thin layers over all hull areas of the entire model. Once that is done I applied a slightly thinned down wash of Army Painter Dark Tone Ink. Once the wash is down I used a damp brush to clean up the excess in order to prevent tide marks and large, ugly patches of wash from pooling.
And now I’ve done a heavy drybrush of US Dark Green, followed by a lighter drybrush of a roughly ¼ ratio mix of Buff and US Dark Green.
Tracks
After I finished the first pass on the hull colour I started on the details. The first being the rubber skirts and rubber road wheels. To start with I did a 2-3 layer basecoat of Black (VMC 70.950). Next up I layered Black Grey (VMC 70.862) over the black.
The tracks modelled on the model appear to be the metallic only version, lacking the rubber pads that make it easier to drive on roads. Therefore I’m opting to paint the tracks pure metallic. Since I want to keep the metals realistic, hence muted metallics. To do this I will use Black mixed in with Gunmetal Grey (VMC 70.863) at a 4/1 Black/Gunmetal ratio. Once our basecoat is down and dry I’ll give the tracks a very light drybrush of a Black/Gunmetal mix at a 2/1 ratio.
I also did a first pass at weathering the tank at this stage. To do this I washed in some Chocolate Brown (VMC 70.872). To get this wash I mixed the colour in question with a heavy amount of glaze medium. Once the weathering is dry I did another light drybrush with with the 2/1 mix of Black/Gunmetal.
At this point I left the tracks to dry overnight as the glaze medium drastically slows down trying time. Once that was completed I assembled the lower hull and let it dry. While that was going I painted the Canvas Mantlet cover on the main gun. For this colour I used Beige Brown (VMC 70.875), once it was dry I followed up with a wash of Army Painter Strong Tone Ink, let it dry, then re-layered all but the deepest recesses with Beige Brown.
Fitting It Together
Next up I applied the transfers using my usual combination of Glaze Medium and Gloss Varnish (VMC 70.596 and VMC 70.510) to prepare the surface. Then I used Microscale Industries Micro Set and Micro Sol to prepare and apply the stenciled number transfers that came with the models. I left them for an hour to fully set, then I applied a mixture of Matt Varnish (VMC 70.520) and Glaze Medium in order to kill the gloss from the preparation step.
To Finish the T-72 I did two drybrush layers. The first layer was an soft, overall layer of Dark Sand (VMC 70.847), for this model I went a bit too heavy, as I often do with dry brushing. For future models I will remember to take it easy. Next up I did a fairly heavy drybrush of Flat Earth (VMC 70.983) on the lower hull, side skirts, tracks and running gear. At this point I’ll finish up the DSHK with the same colours that I used for the tracks, except I didn’t bother to highlight the metal.
Final Highlights
With that done our model is complete. Overall I’m happy with this result, especially since I have nine more of these vehicles to complete and the time taken to achieve this result was very quick in terms of working time. I could probably batch the entire line out in a weekend if I had the inclination to do so. One thing I didn’t get quite right compared to real life were the ammunition boxes on the cupola machine gun. They were normally a canvas of some kind or a differently coloured metal, but I opted to leave them the same colour as the hull out because I am a lazy painter with too many models to paint.
I’m planning to use this paint scheme for the rest of my Team Yankee Soviets, and will work perfectly for any other vehicle in the Soviet army list, save for the aircraft. Once I finish off the tanks are done I’ll have a crack at the Hinds and write up the results. I hope this guide was useful to you and thanks for reading.
Colours List
Vallejo
US Dark Green (VMC 70.893)
Buff (VMC 70.976)
Black (VMC 70.950)
Black Grey (VMC 70.862)
Gunmetal Grey (VMC 70.863)
Chocolate Brown (VMC 70.872)
Beige Brown (VMC 70.875)
Dark Sand (VMC 70.847)
Flat Earth (VMC 70.983)
Glaze Medium (VMC 70.596)
Gloss Varnish (VMC 70.510)
Matt Varnish (VMC 70.520)
Army Painter
Army Painter Dark Tone Ink
Army Painter Soft Tone Ink
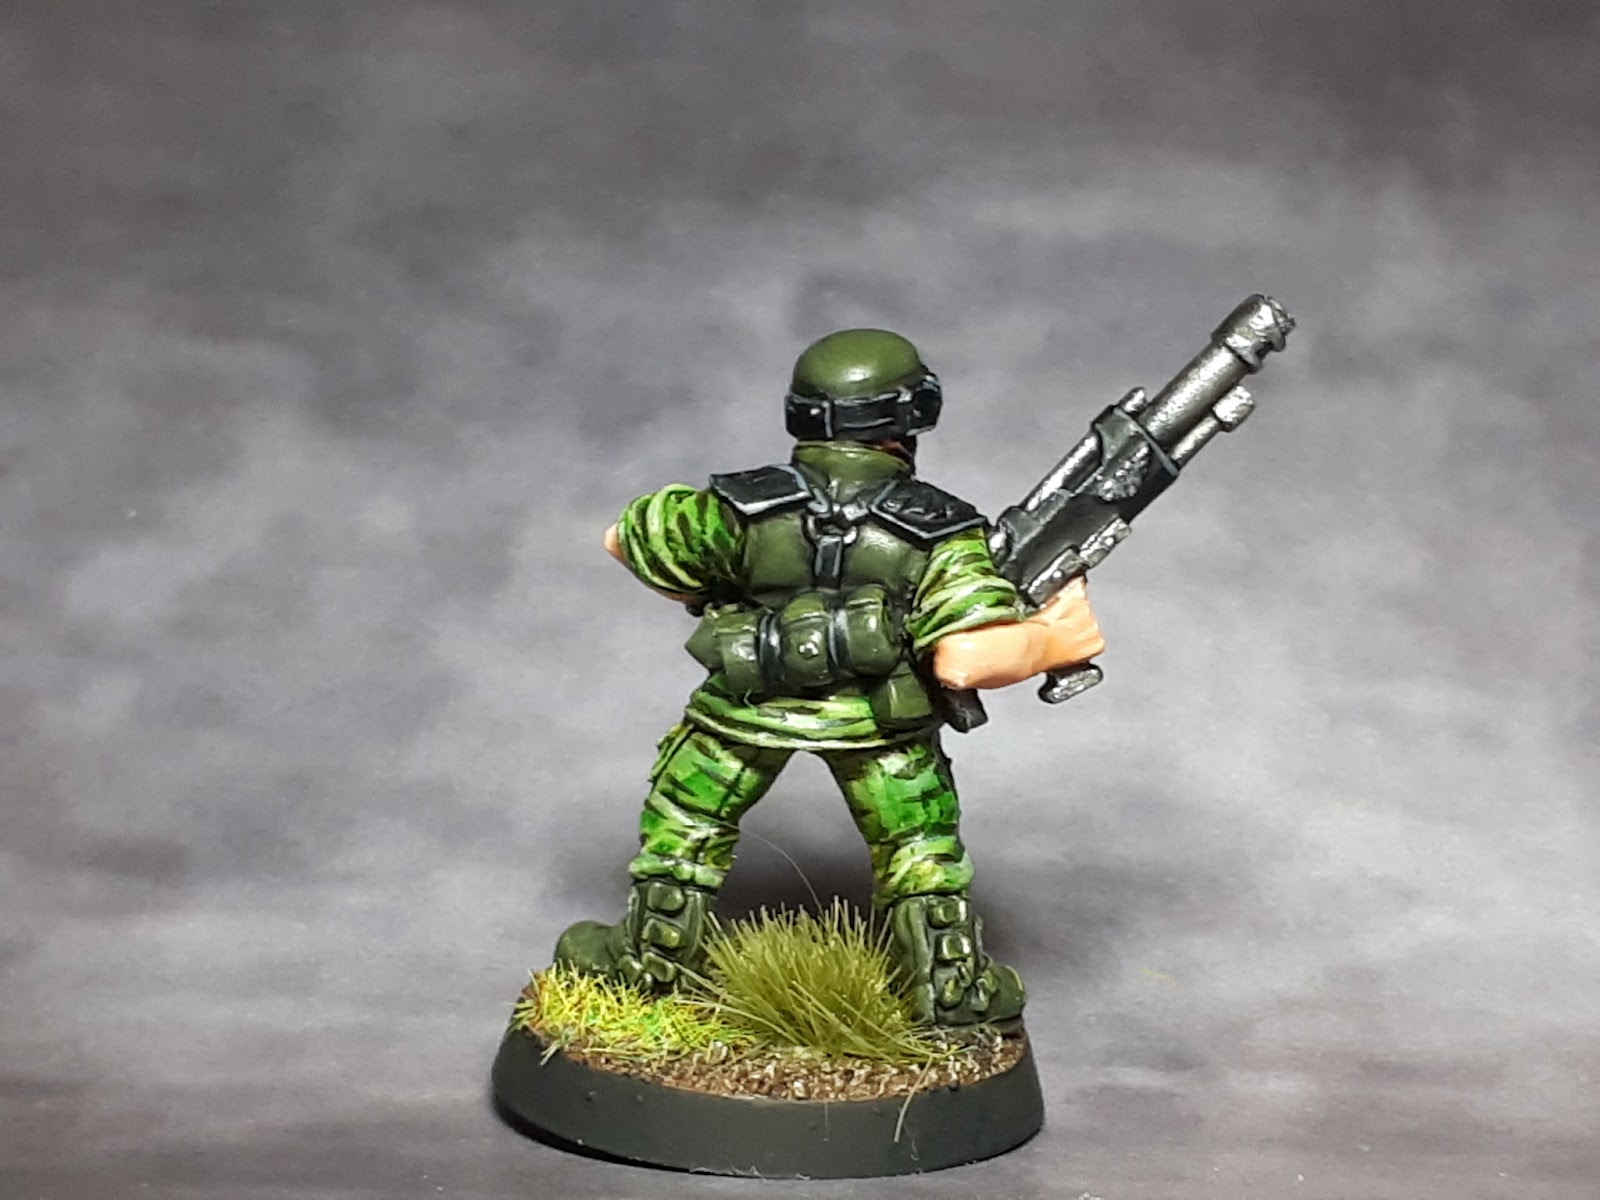
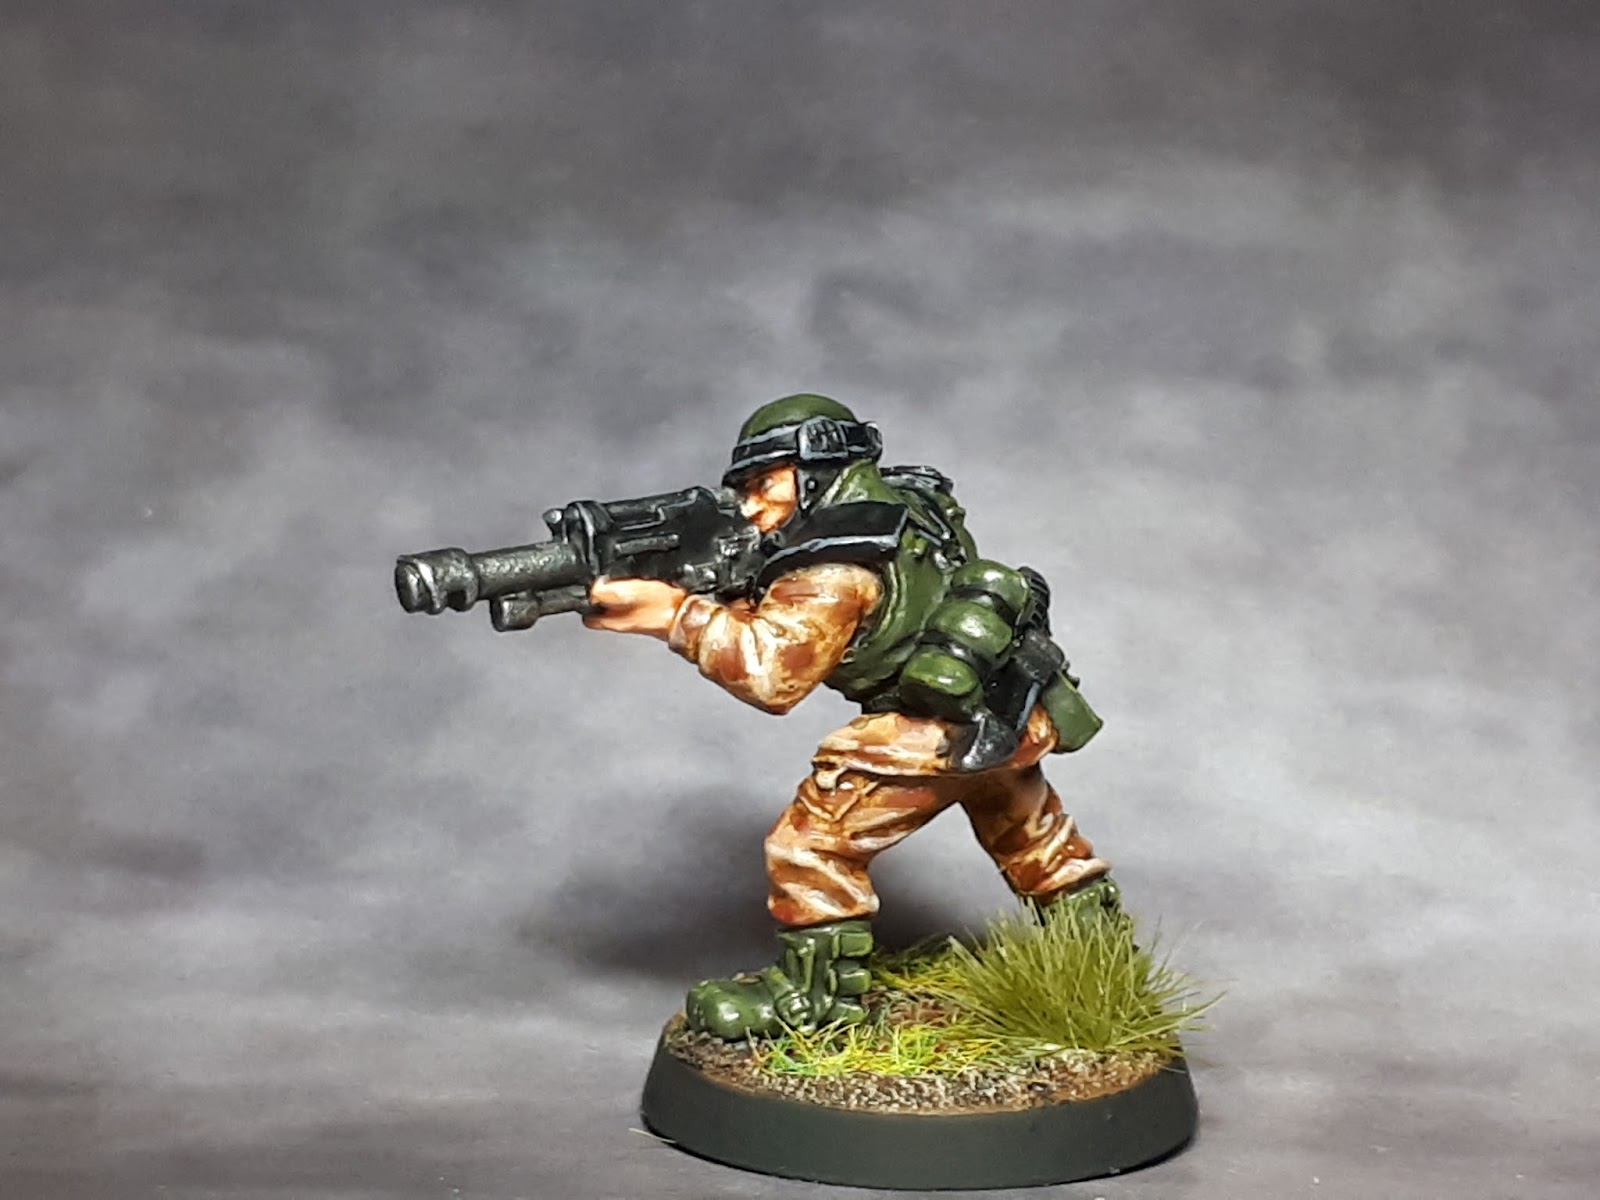
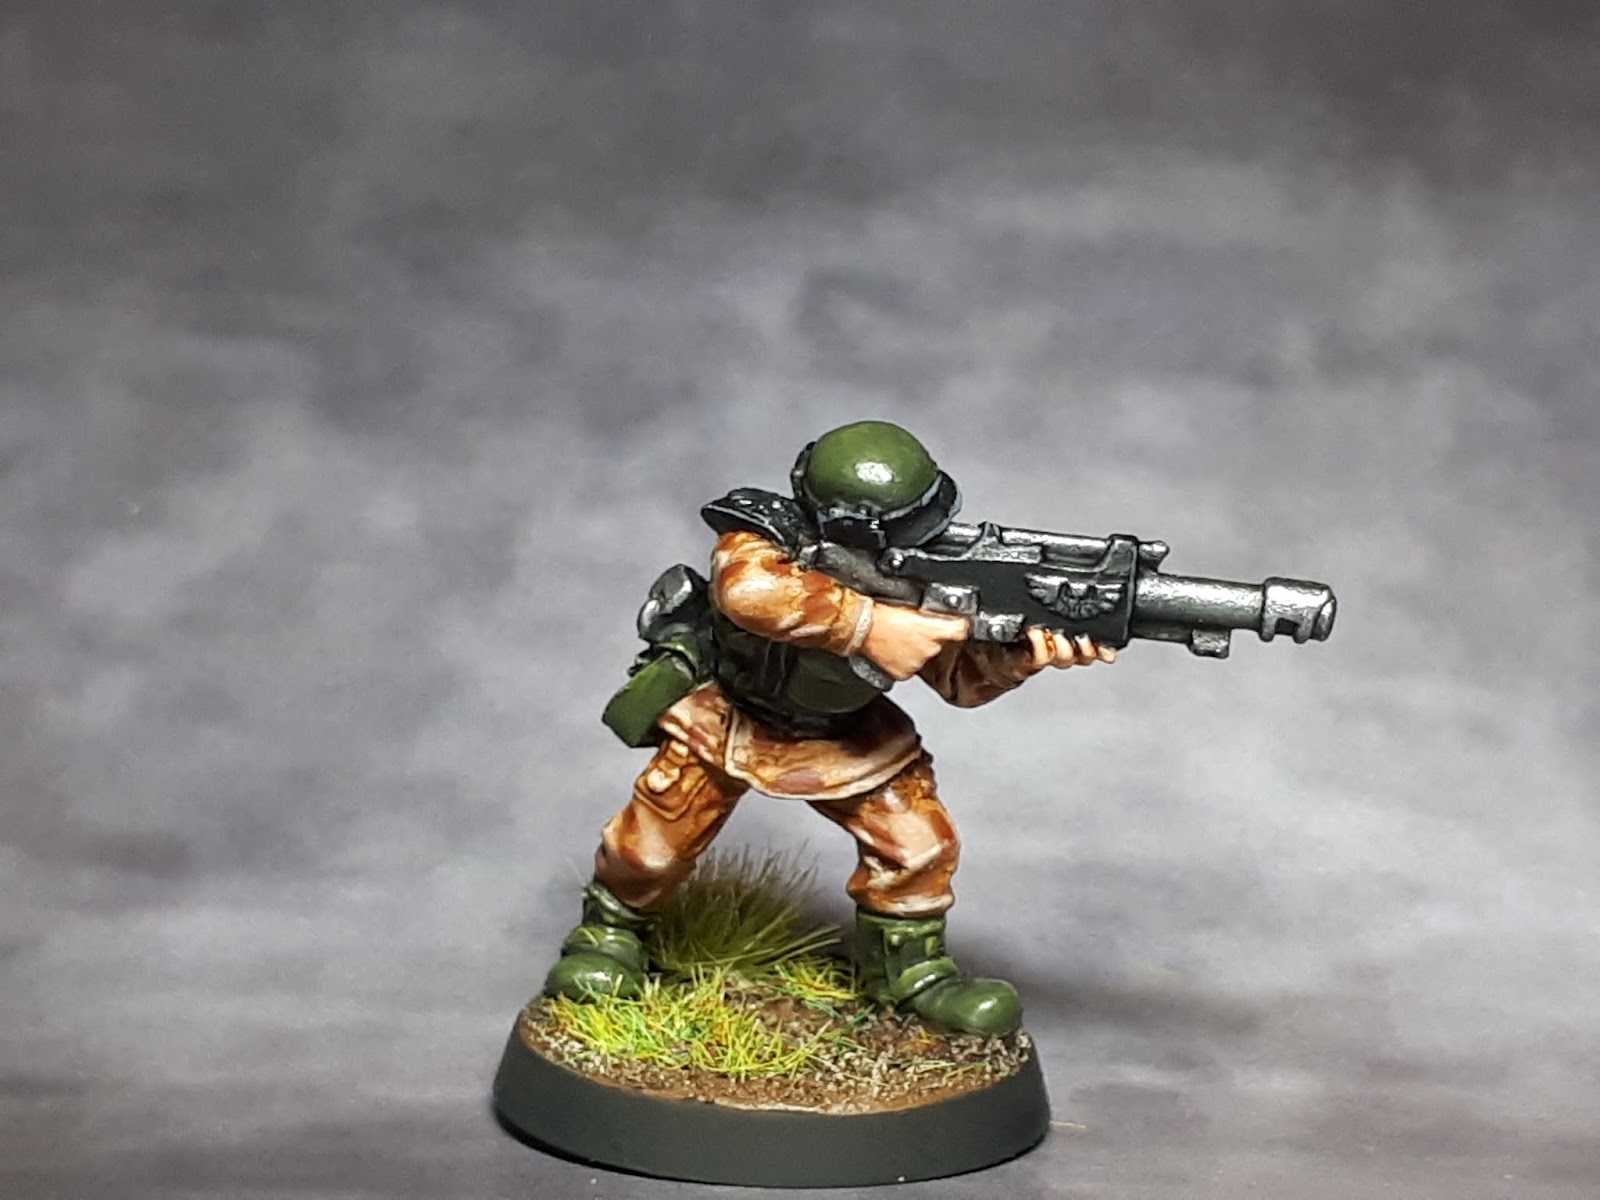
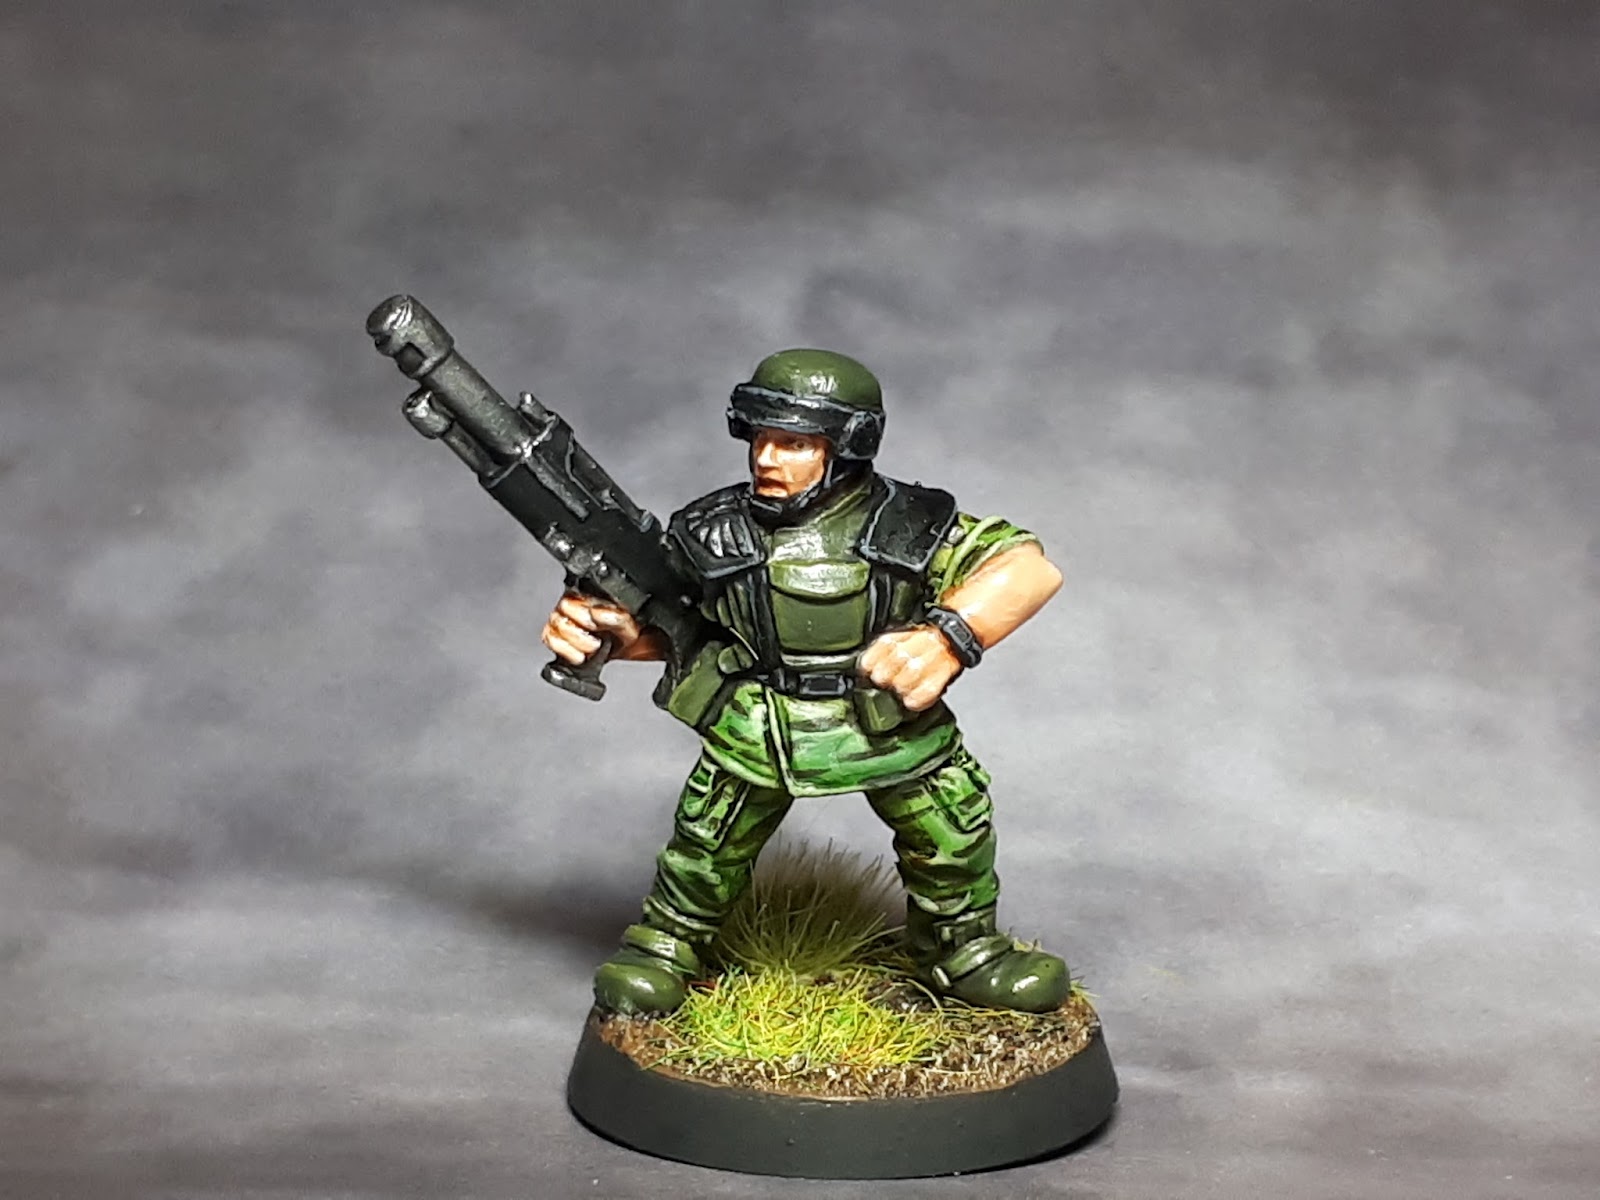
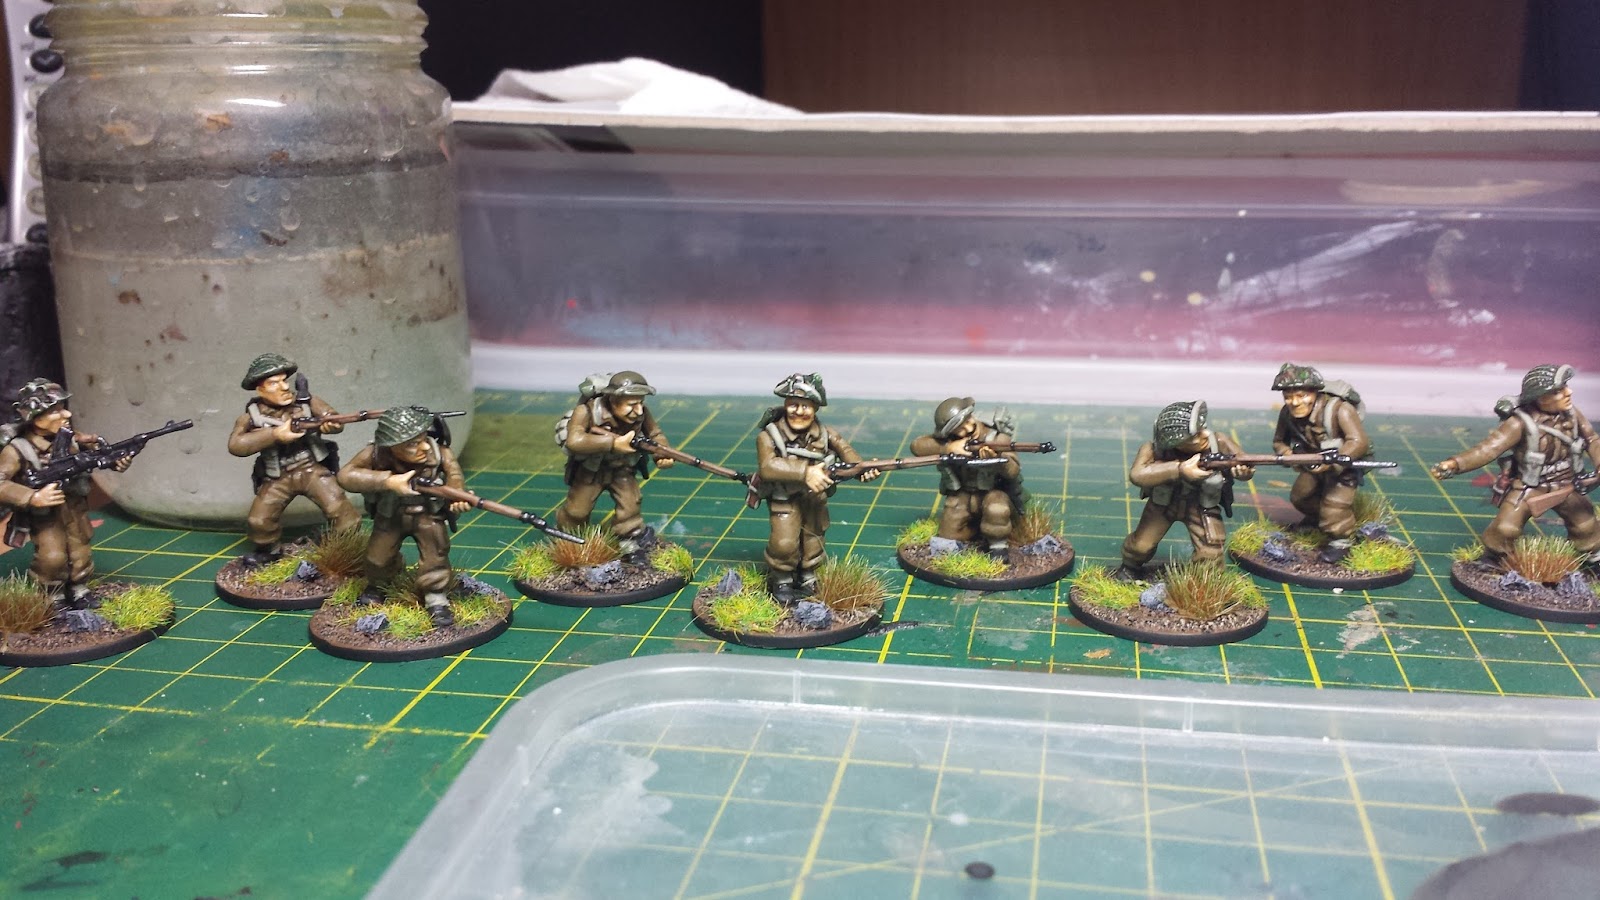
British Infantry Painting Guide for Bolt Action
British Infantry Painting Guide for Bolt Action
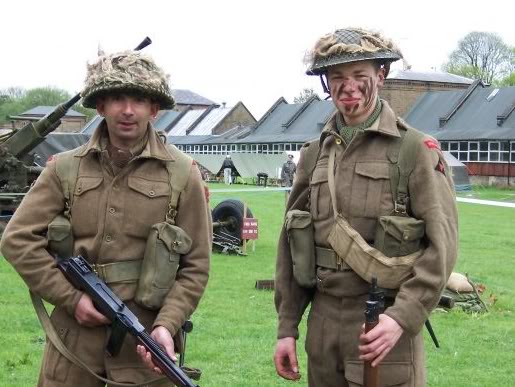
A few years ago I decided to get into Bolt Action. Naturally since I was a big British player in in Flames of War with the British, I decided to buy in with the basic starter box. Move ahead several more years and my painting backlog finally cleared to the point where I could make a start. I've already done a two part Youtube video series on how I went about painting it, but it occurs to me that I may have been a bit too... inarticulate with my description of the painting process. Since I'm way better with the written word rather than the spoken word I've decided that I'll start going into detail on this blog about the colours, techniques, and methods that I use to achieve my results. I planned this process to achieve a middling level paint job due to quantity of these figures that I intend to get through. This means that I won't be hitting some of the extreme details to a perfect level of accuracy. Given the occasionally soft detail on the Warlord Games plastics, this is perfectly reasonable.
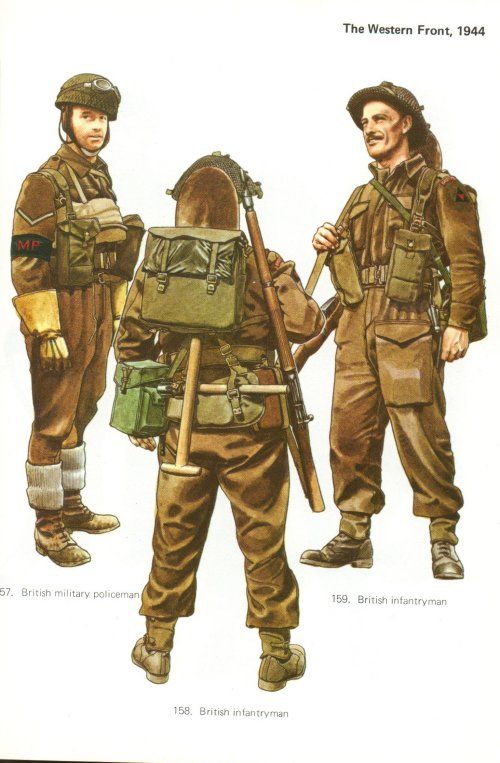
The British Infantryman - 1944
The dress of the British soldier of this period typically consists of a green-brown uniform jacket and trousers, a canvas belt kit that varied in colour from a khaki to a very pale green, and the iconic "Brodie" helmet, frequently worm with netting to break up it's distinct outline. In terms of small arms, the British soldier typically carried the Small Lee Enfield No 4. as the standard infantry armament and the Mills Bomb as the standard issue hand grenade. Most sections were also equipped with one to two Bren Light Machine Guns, and NCOs occasionally carried Sten Submachine Guns. In terms of heavier firepower at the platoon level, the British used a small 2 inch mortar to both lay down smoke and drop high explosive shells. This weapon was typically used to pin and destroy entrenched positions such as machine gun nests. In terms of anti-tank firepower, each platoon was usually issued a single PIAT, a direct fire spigot mortar that launched a shape charge warhead designed for penetrating armour plate. Like most allied infantry carried anti-tank weaponry it was inferior to the German equipment, but the PIAT also had the unique ability to be used in enclosed spaces without back blast, making it ideal for urban warfare. British infantry, like almost all of their contemporaries of the era, fought in teams of ten to twelve men, called a Section in British terminology. In the field a section would occasionally split into a fire and a maneuver elements of five to six men while in battle, though in all other times this was as small as a fighting formation typically was. As usual, first step before any paint hits the model is to do some quick googling to get some reference photos.
Stage 1 - Assembly, Preparation and Priming
First stage is to decide what role the model will fulfill within your force. This is relevant to selecting what weapons the model should carry. Section leaders must, and some officers may, typically carry a Sten SMG. If you are Assembling a Bren gunner, one of pouches on the sprue is a spare barrel and tool bag. Typically even LMG teams were usually two to three men. One man carried the gun while the other carried spare ammunition and the spare barrel. Giving this tool bag to a regular rifleman to represent the assistant gunner should be fairly accurate. As for what to attach where, there is plenty of reference material on the internet and in the starter box itself. I'd definitely recommend finding a few good examples before beginning assembly. Also be sure to clip out the correct set of arms for your weapon choice, check and re-check the sprue description sheet that comes with the box before you do any assembly.
Once you've liberated the necessary parts from the sprue, clean them up in the usual way. Scrape the mold lines off with the hobby knife or mold line remover of your choice, sand down as necessary with a sanding stick or very fine grade sandpaper. Though be careful not to remove any detail while doing so. Of all the war gaming kits that I've assembled, the Warlord Games plastics have some of the most spindly components of the lot of them. I find this makes it very easy to break components like weapons while attempting to remove them from the sprue. To avoid this try to clip away from the model and trim down with a hobby knife once the part is off the sprue.
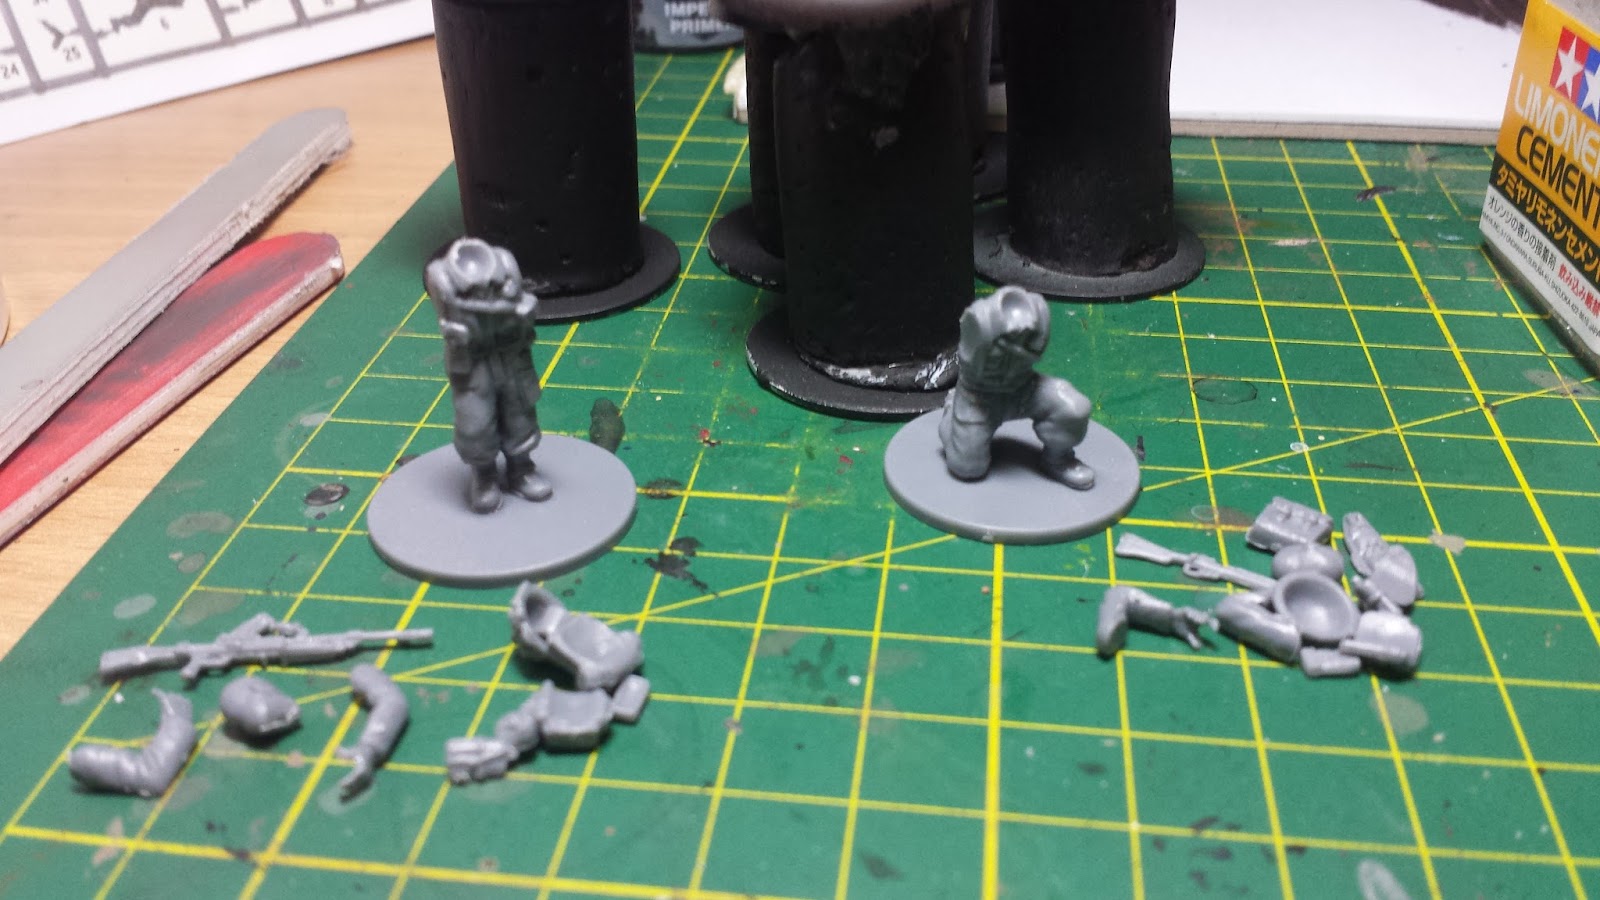
I usually start with gluing the body/torso component to the base to provide something to work off. Then the weapon arms, which can be quite hellish, as you have to test hit the weapon and the arms all before gluing. To make the best of this I recommend gluing the hand holding the weapon's trigger first while off the model. Then once the weapon / firing arm is one piece, glue that piece to the model in the pose that you want, then let the model thoroughly dry. Once an hour or so has past test fit the other arm and figure out where the figure will grip the weapon, the apply glue to that spot as well as the arm itself, then hold the other arm in place until dry.
Once the weapon arm is out of the way the belt kit should be relatively easy. The part I usually leave last is the head, as I use this point to decide where the model should be looking, either down the barrel of a raised weapon in the cast of a miniature that is firing, or looking in another direction to represent the model scanning for threats. Since the helmet is a separate piece from the head that is always the very last piece that I glue on. With the helmet I usually tilt it back slightly so that the model's eyes aren't obscured.
The very final stage is gritting up the base. My usual mixture, now that my excellent tub of old school citadel mixed grit has run out, is to first glue some cork rocks on the base with PVA glue. Once those are dry I apply two overall coats of PVA glue to the remaining clear areas and slide the base through my tub of citadel fine grain sand. This effect gives a somewhat even ground broken up by a few rocks.

Once the PVA is dry, I attach the model to a painting stand, then undercoat with Citadel Miniatures Black Primer, though any black primer of your choice will work just as well.
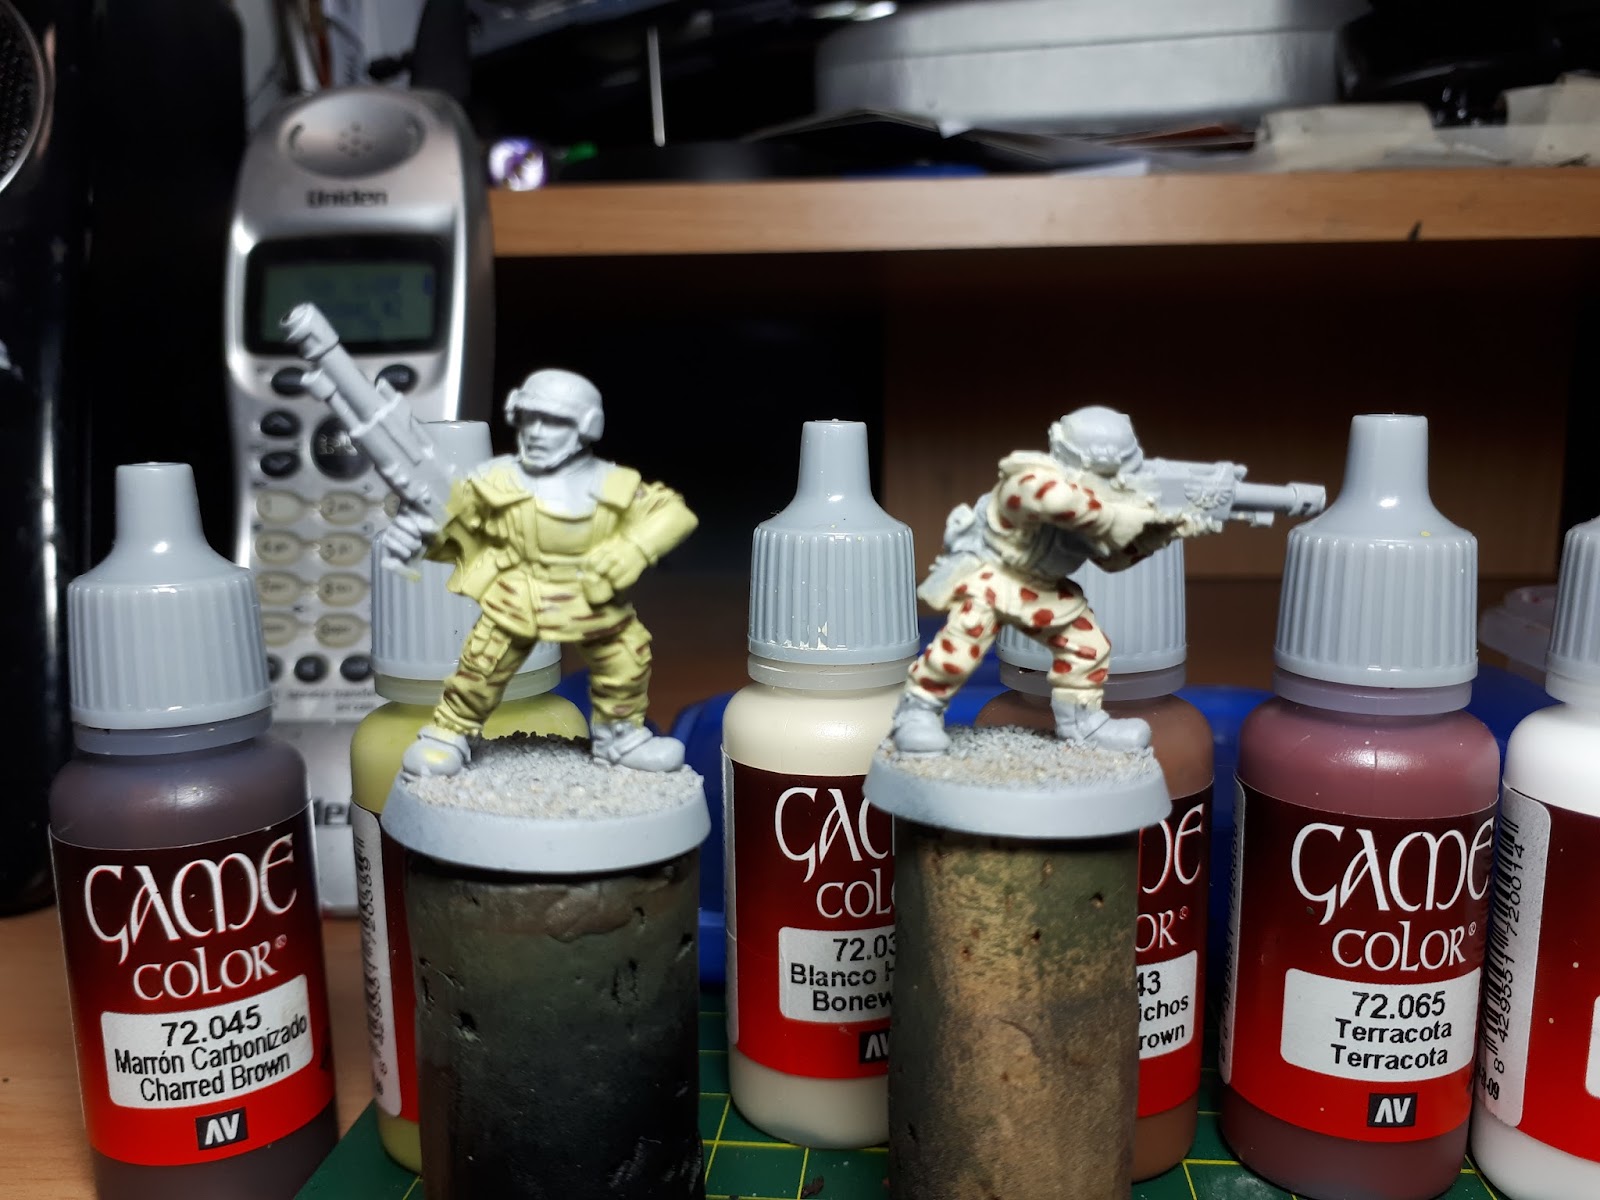
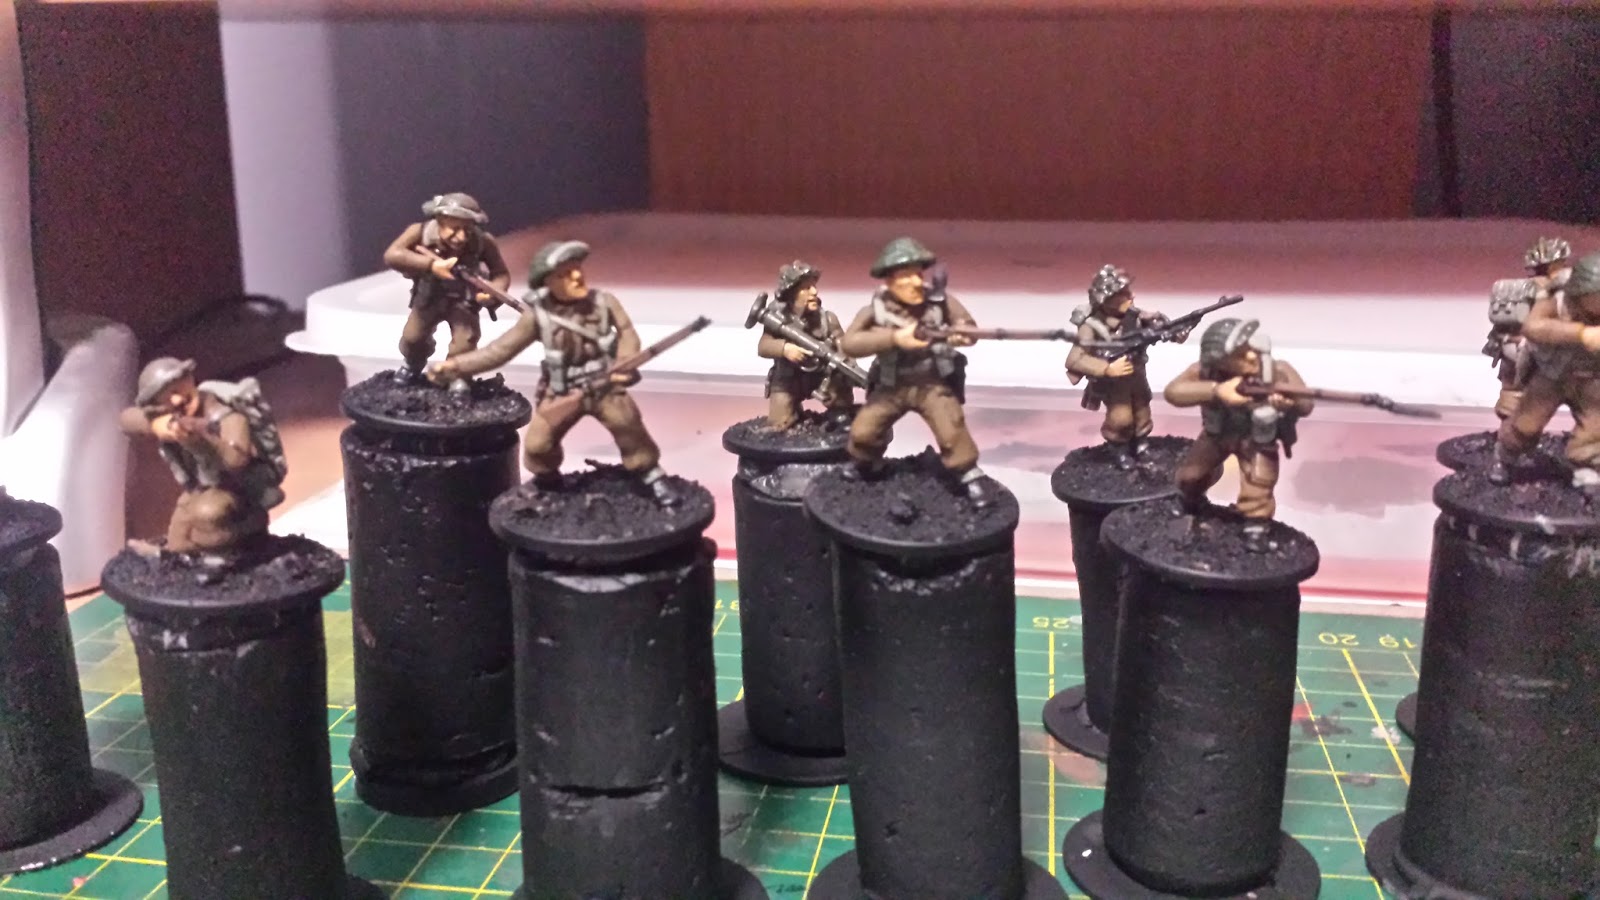
Stage 2 - Base Colours
The first stage, and most time consuming by far, for batch painting is to establish your initial basecoats. Since this project uses all Vallejo paints the base coat requires at least two to three thin layers of each colour to get a solid layer. The only two instances where I do things a little differently are the helmets with netting or camouflage and the metallic components of the weapons.
All of the colours are consistent across all of the models, except for any exposed hair if there is any, in this case I recommend picking out some dark browns, reddy browns, blacks, sandy yellows. Feel free to use whatever works for you when painting hair.
Helmet Netting
Since the painted metal is a different colour from the netting use. I first put a solid base coat of the painted metal colour (Brown Violet VMC 70.887) on first, then over brush with the netting colour (Military Green VMC 70.975 and VMC Olive Green 888 mixed at a 50/50 ratio). Most of the original Colour will barely be visible once the wash goes on, but hints of the metal colour will still be there. The same is true for the heavily camouflaged helmets, except pick a few different tones of green and brown the use for the pieces of foliage.
Metallics
If you ever get the chance to handle weapons from World War 2, or see examples in person, one of the things you will notice is that the metallic parts are very black. To simulate this, while keeping the metallic finish looking metallic the base colour I use for the metallics consists of three parts Black (VMC 70.950) and one part Gunmetal Grey (VMC 70.863). This will result in a very black colour with a slight metallic sheen, perfect for weapon components.
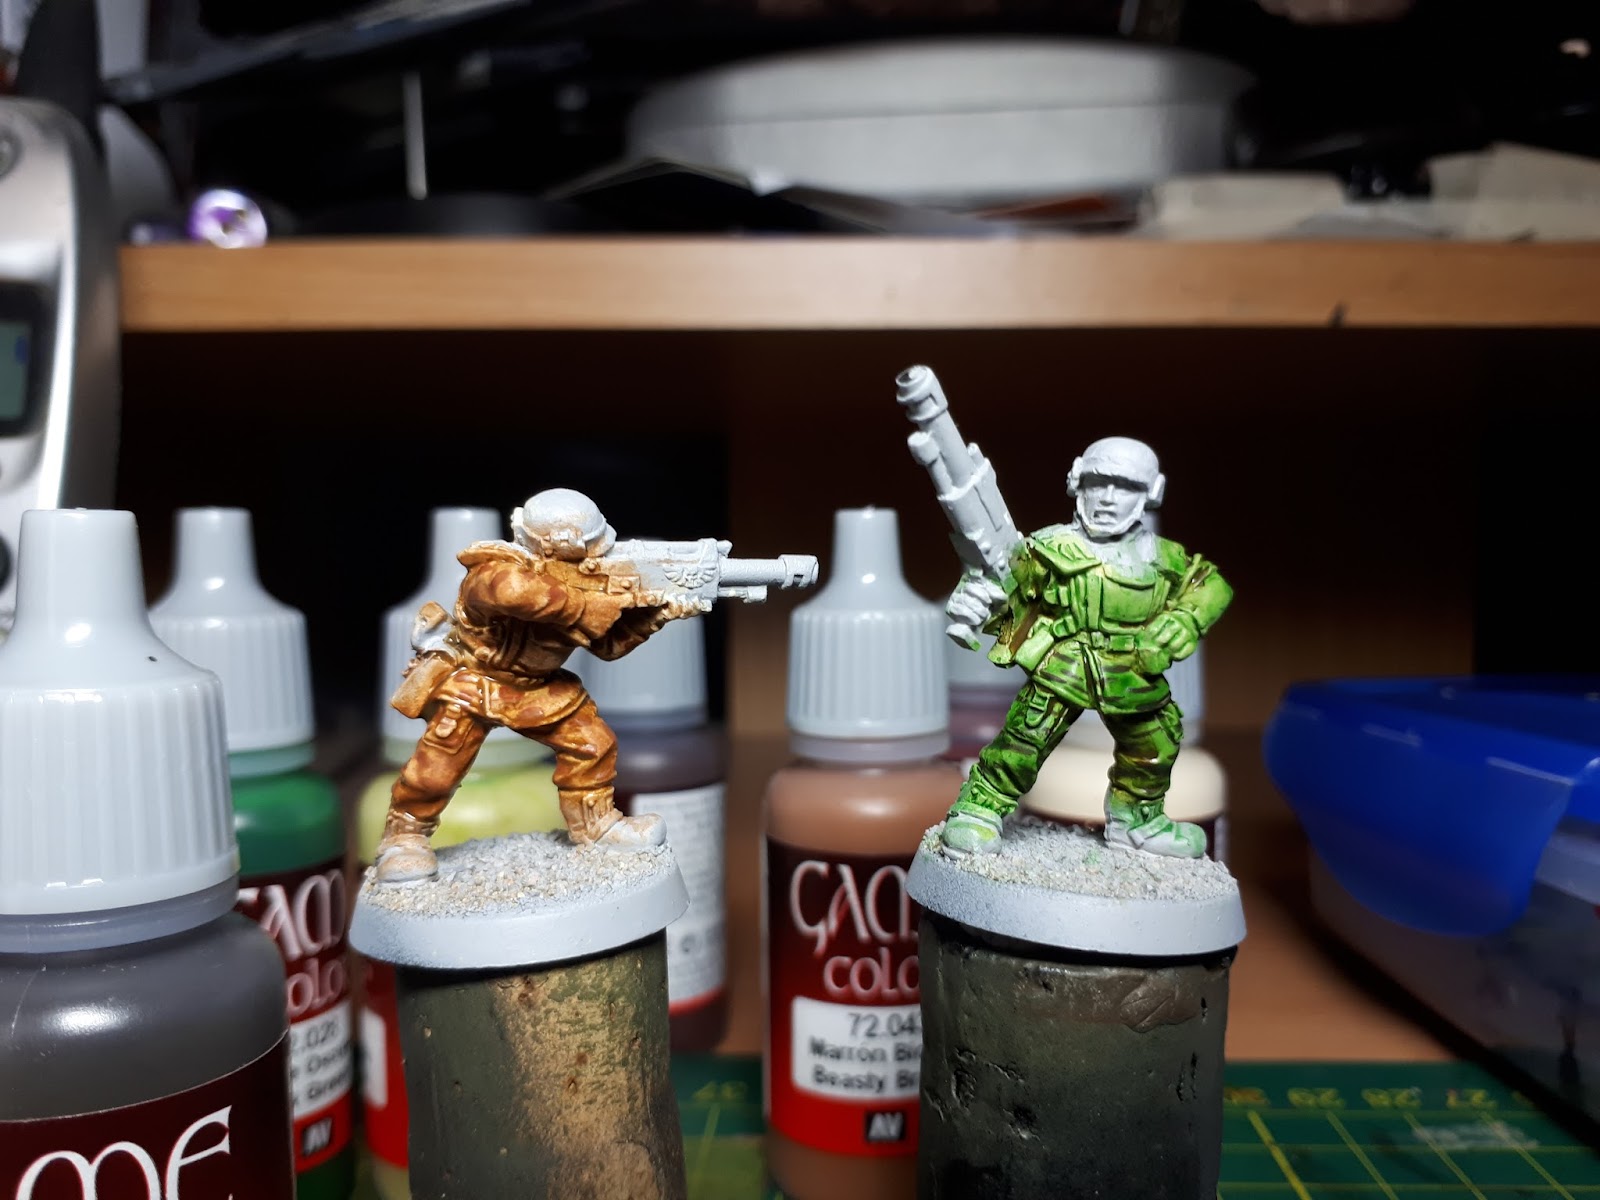
Stage 3 - Wash
Once all of the base coats have been applied, the next stage is to apply an overall wash of Army Painter Strong Tone Ink. In this case there are two parts to the wash. The first is an overall application of colour, the next is going back in with a damp brush to soak up any excess ink as it begins to pool. The overall effect that you are going for is an even tinting of the model with a slight accumulation of darker colour in the recesses. If too much of the wash pools in these recesses it goes from tinting the colour to leaving ugly blotches of brown on the model. The application and clean up phase of this stage should be done very quickly as the wash tends to dry fairly quickly. Attempting to clean up the wash while it is halfway dry will leave ugly tide marks.
Stage 4 - Re-Layer
This stage involves restoring the original colour that we washed over in the previous step. This process should catch about 70% to 85% of the model, thought that is not a hard and fast rule. The ultimate idea of this step is to re-layer the colour in the intermediary areas that are in between the highest highlights and the shades. With this in mind you should leave the shaded basecoat in between the folds of the clothing, on the undersides of the arms and in between the legs, and under any piece of equipment that would cast some shadow.
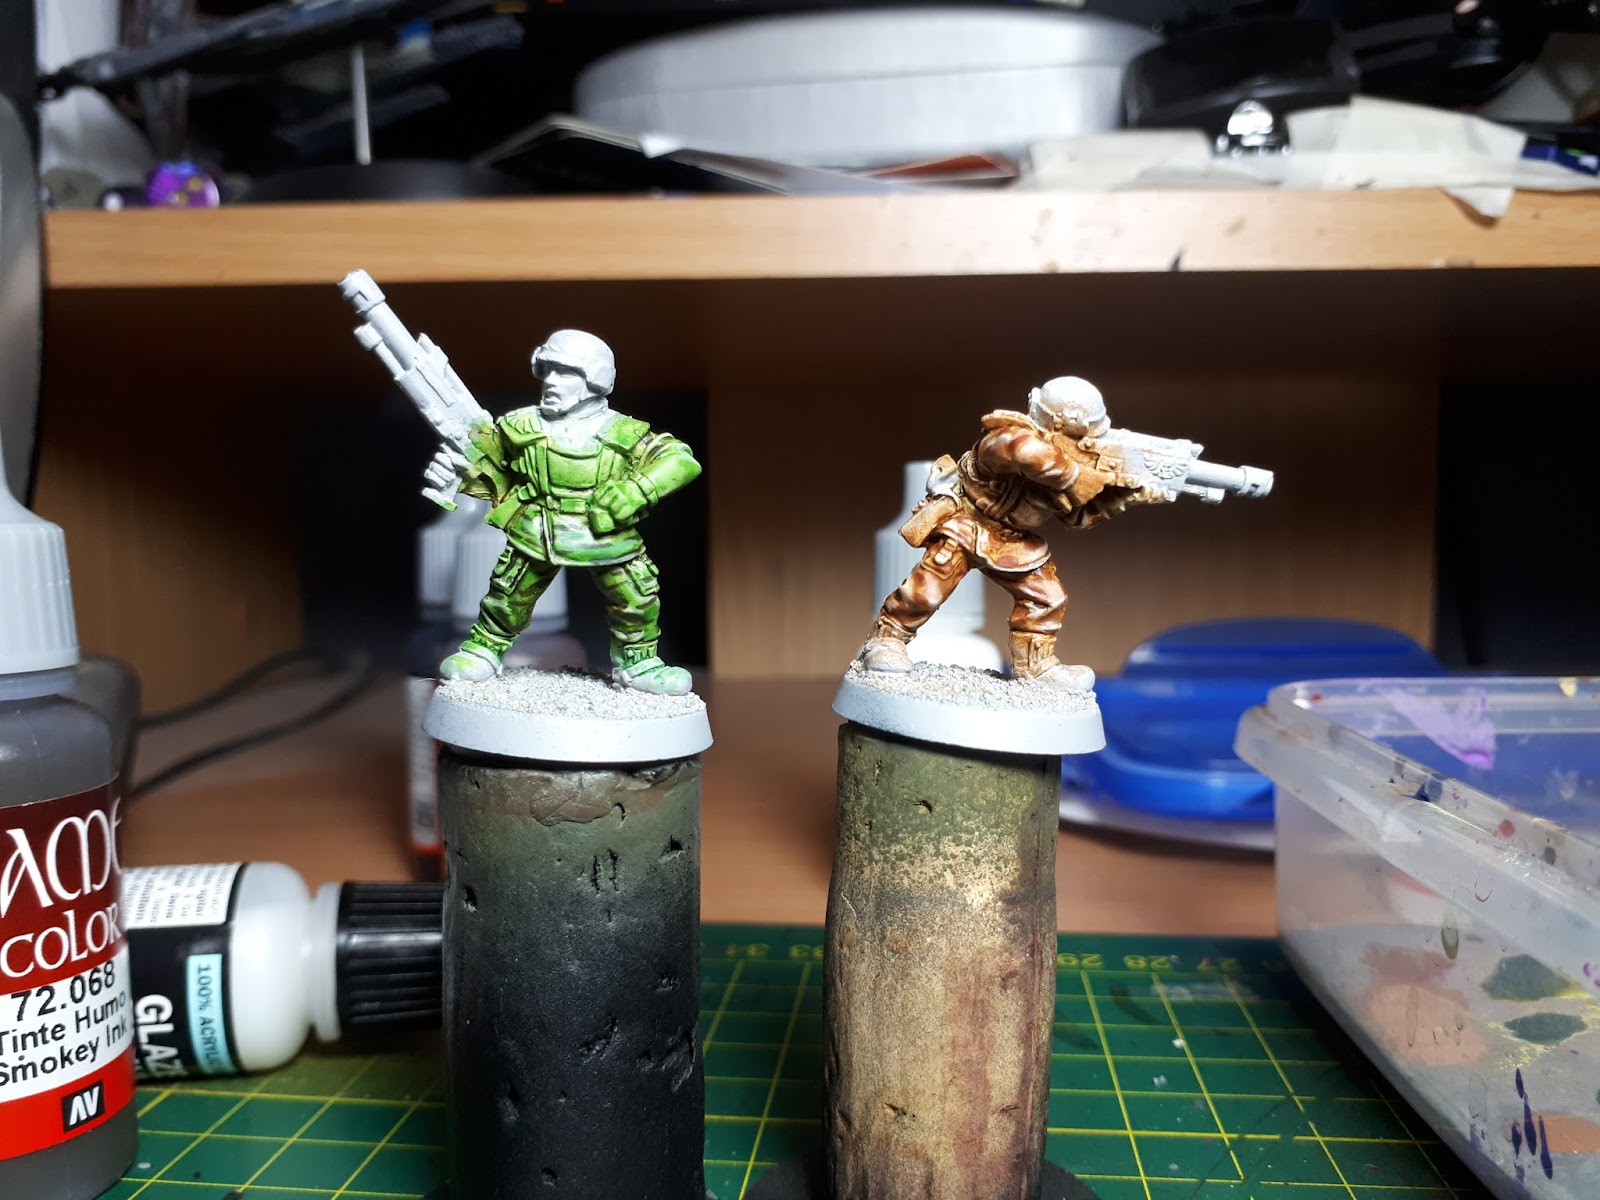
Stage 5 - Highlights
When applying highlights in this project I prefer to use glaze medium, combined with a mix of my base colour and highlight colour to start building up highlights on the model. From this point I hit each of the highlight areas with small and smaller areas with a paint mixture that has less and less amounts of glaze medium and more of more of the highlight colour in ratio to the base colour. Eventually this will lead to an almost entirely base highlight colour as a very fine edge highlight for the very sharpest edges. There are a few highlights that don’t follow this method. The first are the helmets with camouflage and netting, the flesh, and the metallic components.
For the helmet I don’t worry about highlighting the individual colours, instead I apply an overall drybrush of Buff (VMC 70.976) and Russian Uniform (VMC 70.924) mix at a roughly fifty/fifty ratio. In the case of the metallics I make another mix of about fifty/fifty Black and Gunmetal Grey. I only apply this highlight in very small amounts only to the sharpest edges to try it get a slight metallic glint going.
For the flesh I apply highlights the same way as the regular colours, except the highlights are concentrated on the cheeks, the nose, any laugh lines around the face, the very tip of the chin if I feel it is prominent enough, and the brow ridge.
Stage 6 - Final Details
For this model I don’t usually do any further finishing details except for the eyes and the hair.
In the case of the eyes I take my usual simple wargaming eyes approach. First a mix of the base flesh colour with brown. Next a layer of Off White (VMC 70.820) in the usual almond shape of an eye, then German Grey (VMC 70.995) for the eye dot. If need be I use the base flesh shade mix, or the mix of the base flesh colour with brown to redefine the shape of the eyes as needed to keep the size of the two eyes consistent. Also try to make sure the eyes are “looking”, i.e. if the model is firing a weapon at something, make sure the eyes are positioned such that they are looking down the sights of the weapon. If a soldier has their weapon lowered and their gaze pointing elsewhere feel free to change the position of the eyes to make it look like he is looking out of his peripheral vision.
Stage 7 - Basing
For the base I follow my usual approach to doing a generic European/Woodland base. I start with a basecoat of German Camo Black Brown (VMC 70.822), an overbrushed layer of Flat Earth (VMC 70.983), and finally a very fine drybrushed layer of Dark Sand (VMC 70.847). Once that is done I start with German Grey as the base colour, overbrush with Grey Green (VMC 70.866), then a sparse drybrush of Sky Grey (VMC 70.989) on the very sharpest edges of the rocks.
Appendix - Paint List By Part / Stage
Shade for all parts - Army Painter Strong Tone Ink
Uniform Jacket / Trousers
Base - English Uniform (VMC 921)
Highlight - English Uniform (VMC 921) / Buff (VMC 70.976) at 1/1 ratio
Webbing / Belt Kit / Puttees
Base - Green Grey (VMC 70.886)
Highlight - Green Grey (VMC 70.886) / Buff (VMC 70.976) at 1/1 ratio
Gas Mask Case
Base - Olive Grey (VMC 888)
Highlight - Olive Grey (VMC 888) / Buff (VMC 70.976) at 1/1 ratio
Bayonet Scabbard / Boots
Base - Black (VMC 70.950)
Highlight - Black Grey (VMC 70.862)
Helmet (No Netting) / Grenades / Painted Metal
Base - Brown Violet (VMC 70.887)
Highlight - (Brown Violet VMC 70.887 / Buff (VMC 70.976) at 1/1 ratio
Helmet (Netting)
Base - Olive Grey (VMC 888) / Military Green (VMC 70.975) at 1/1 ratio
Highlight - Dark Sand (VMC 70.847)
Helmet (Netting and Camouflage)
Base -
Highlight -
Weapons (Wood Furniture)
Base - Olive Grey (VMC 888) / Military Green (VMC 70.975) at 1/1 ratio
Highlight - Dark Sand (VMC 70.847)
Camouflage Colours
-
Flat Brown (VMC 70.984)
-
Uniform Green (VMC 70.922)
-
German Camo Black Brown (VMC 826)
Weapons (Metallics)
Base - Black (VMC 70.950) / Gunmetal Grey (VMC 70.863) mixed at 3/1 ratio
Highlight - Black (VMC 70.950) / Gunmetal Grey (VMC 70.863) mixed at 2/1 ratio
Flesh
Base - Medium Fleshtone (VMC 70.860)
Highlight - Medium Fleshtone (VMC 70.860) / Highlight (VMC 342)
Eyes
Deep Shade - Medium Fleshtone (VMC 70.860) / Flat Brown (VMC 70.984) at 1/1 ratio
Base - Offwhite (VMC 70.820)
Pupil - German Grey (VMC 70.995)
Water Bottle
Base - Flat Brown (VMC 70.984)
Highlight - Saddle Brown (VMC 70.940)
Flat Brown (VMC 70.984)
Uniform Green (VMC 70.922)
German Camo Black Brown (VMC 826)
Subscribe to:
Posts (Atom)